

How To White Balance A Camera
I can nearly guarantee this has happened to yous: yous've set up up for a backdrop-based photoshoot and the calorie-free (either natural or artificial) is looking nifty to your eye. And then you lot take a shot with your DSLR or phone camera. You look to capture something that looks similar the heart photo to a higher place, but instead it'southward bluish. Or yellow. And your heart sinks. Yous aren't sure why that'southward happening, let solitary how to fix it. Well...we're going to fix it now!
In this how-to, we're talking all about white balance and how to achieve those bright whites and authentic colors you meet in professional nutrient and product photos using a DSLR or phone photographic camera! We'll embrace how to identify color "temperature," how to select the best lighting weather condition, how to white rest in-camera, and how to make terminal touches in Lightroom. So permit's dive in!
And so what IS white residual?
The mode our optics see and procedure colors is very different from the style our digital devices record them. Our brains are smart and arrange to dissimilar lighting conditions but your photographic camera needs an extra manus (or eye, if you will).
White residuum determines the accuracy of color in your photographs. In applied terms, it'due south a setting that tells your photographic camera how to register colour "temperature" (which we'll talk about in a sec).
The three main components to achieving proper white residual are lighting, white balancing in camera (it's a settings thing), and editing.
Color Temperature
Earlier nosotros tin select the correct lighting and cull the correct camera settings, we demand to empathise the concept of colour "temperature" and then that we tin can place when the whites and colors in our photos look off.
When the colors in your photo look off, it's not yous, not your camera, not your Surface, it'south YOUR LIGHT! This is because every light source has a distinct colour and "temperature" (ranging from cool to warm) which leads to dissimilar hues in your final photos. While your eyes are able to visualize a piece of white paper every bit truthful white Even if your lighting has a yellow hue, your camera volition come across the paper as yellow due to the yellowish colour that the low-cal is casting on it. Unless, of course, yous help your photographic camera by white balancing!
Conduct with me while we get nerdy for a 2nd, because I think it's important to sympathize how nosotros measure out color (or light) "temperature." Temperature is measured using something called the Kelvin Scale. Every low-cal source emits light with a unique hue and that hue is measured in degrees Kelvin (which is abbreviated as "1000").
The visible portion of the Kelvin Scale ranges from the lower end of 2000-4000K which will come across as more red, orange and xanthous. Imagine the light when you've got nothing but the flame of a candle or the very start peek of a sunrise in the morning.
Equally yous tip toward the end of the scale at ten,000K, the color will slowly begin to plough blueish.The middle of the scale is around 5500K. Ok, that's enough nerding out! Now you lot've got to be wondering, how the HECK practice I set up these warm and cool tones?!

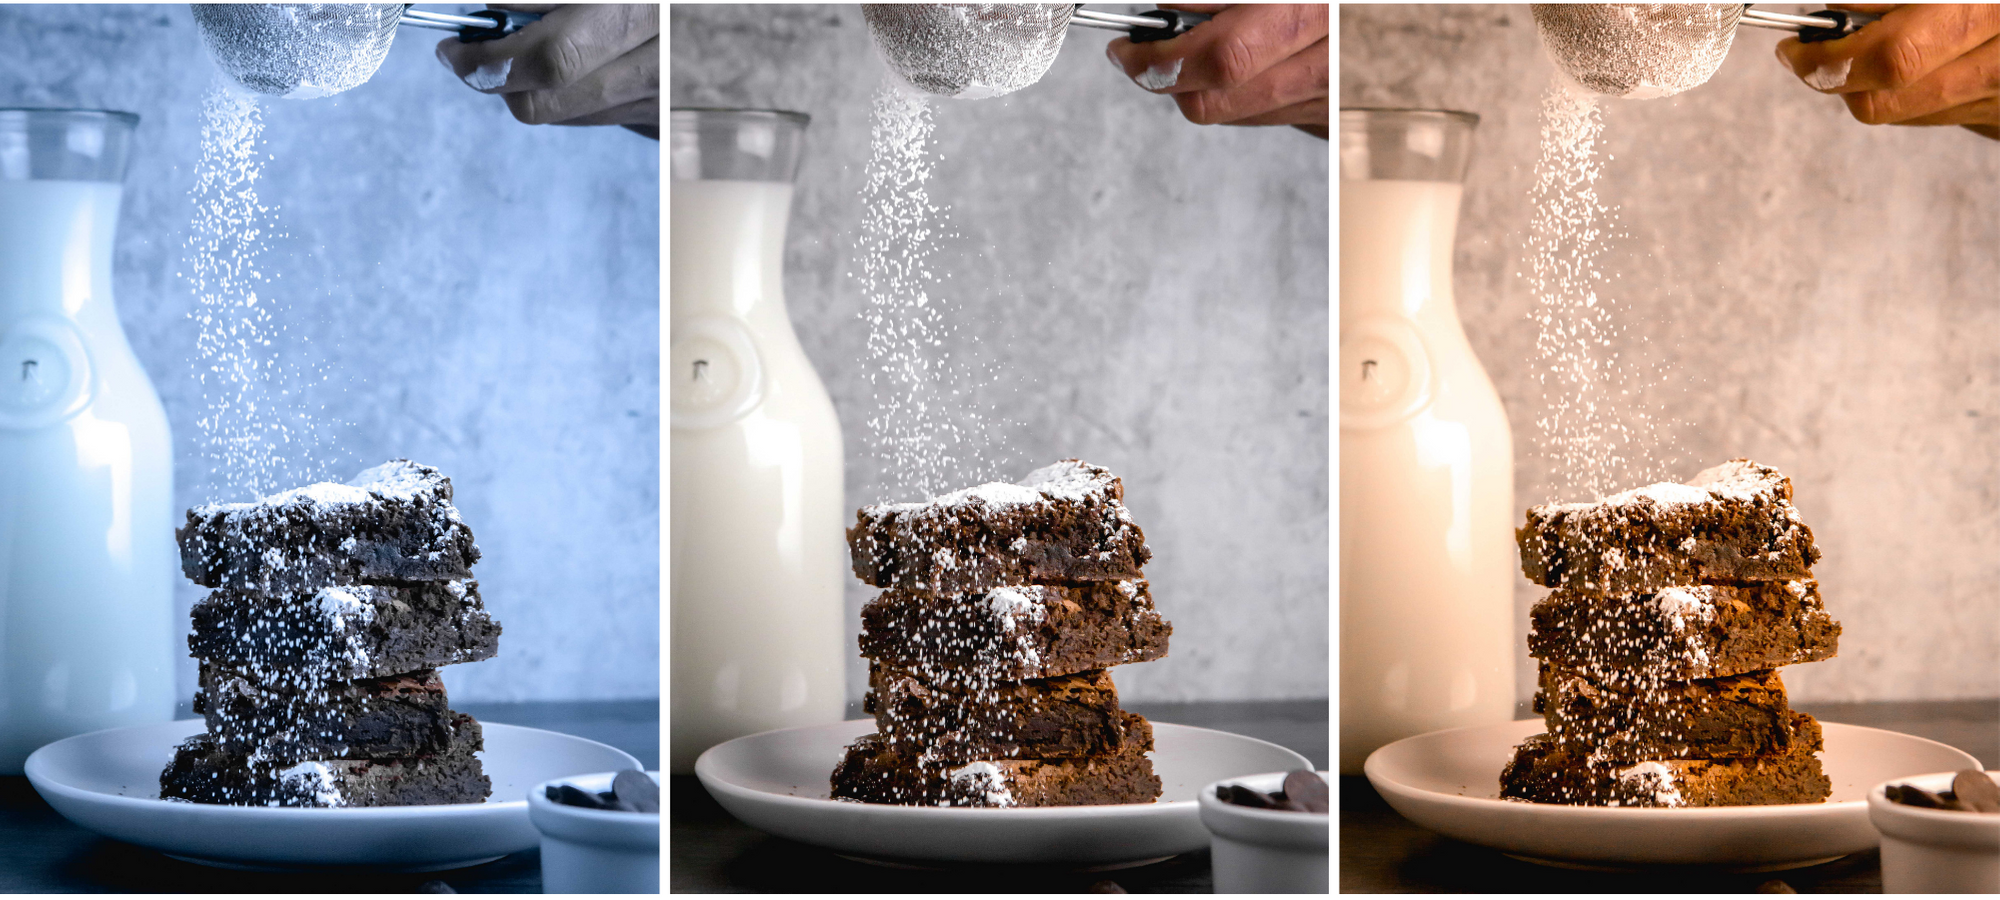
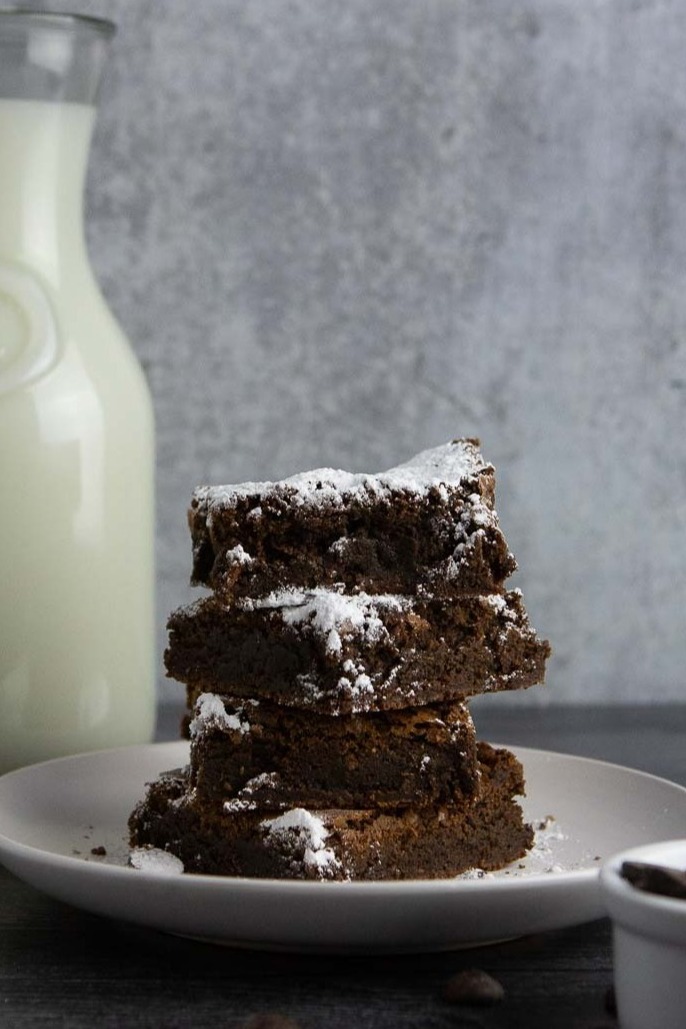
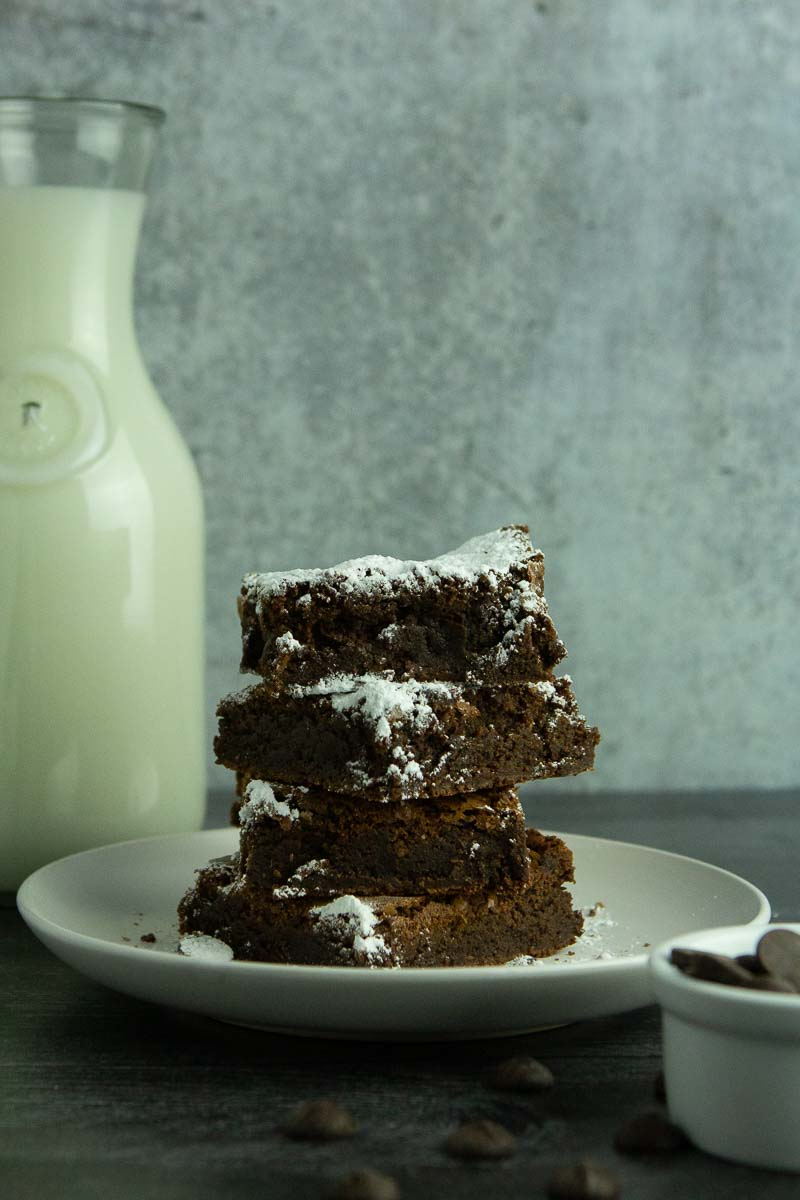
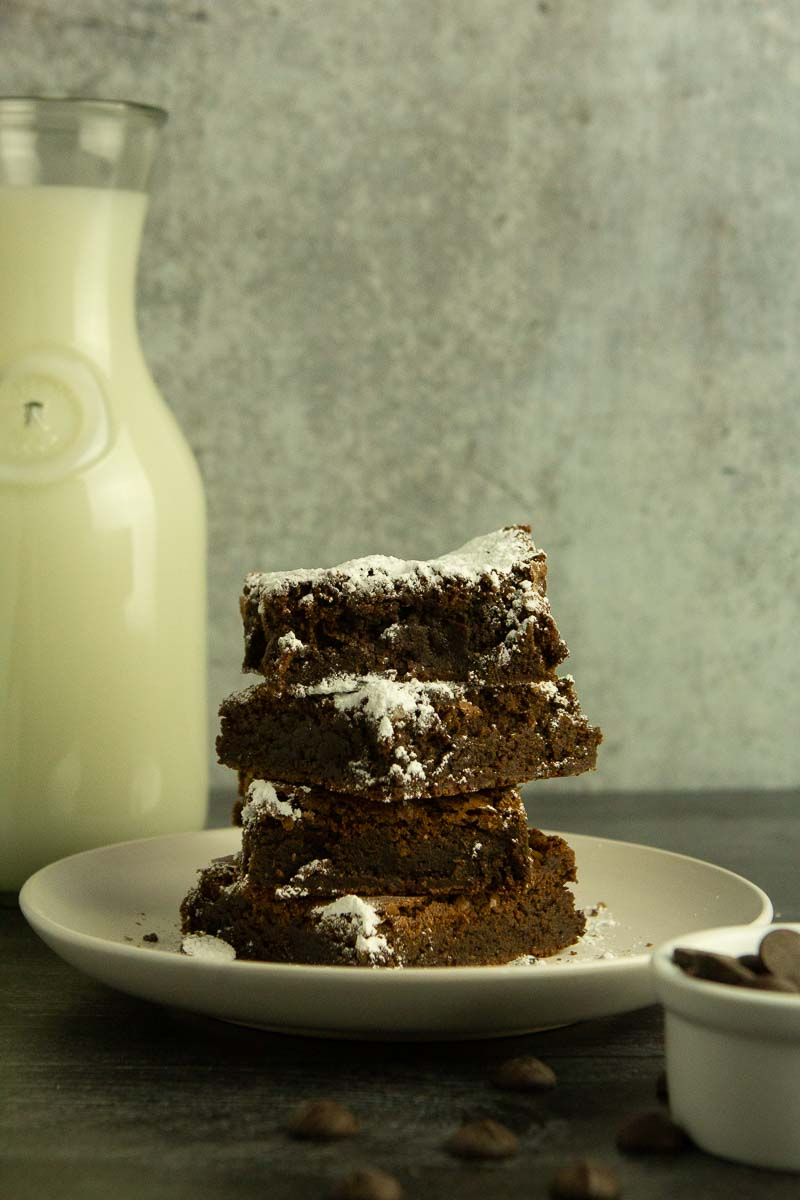
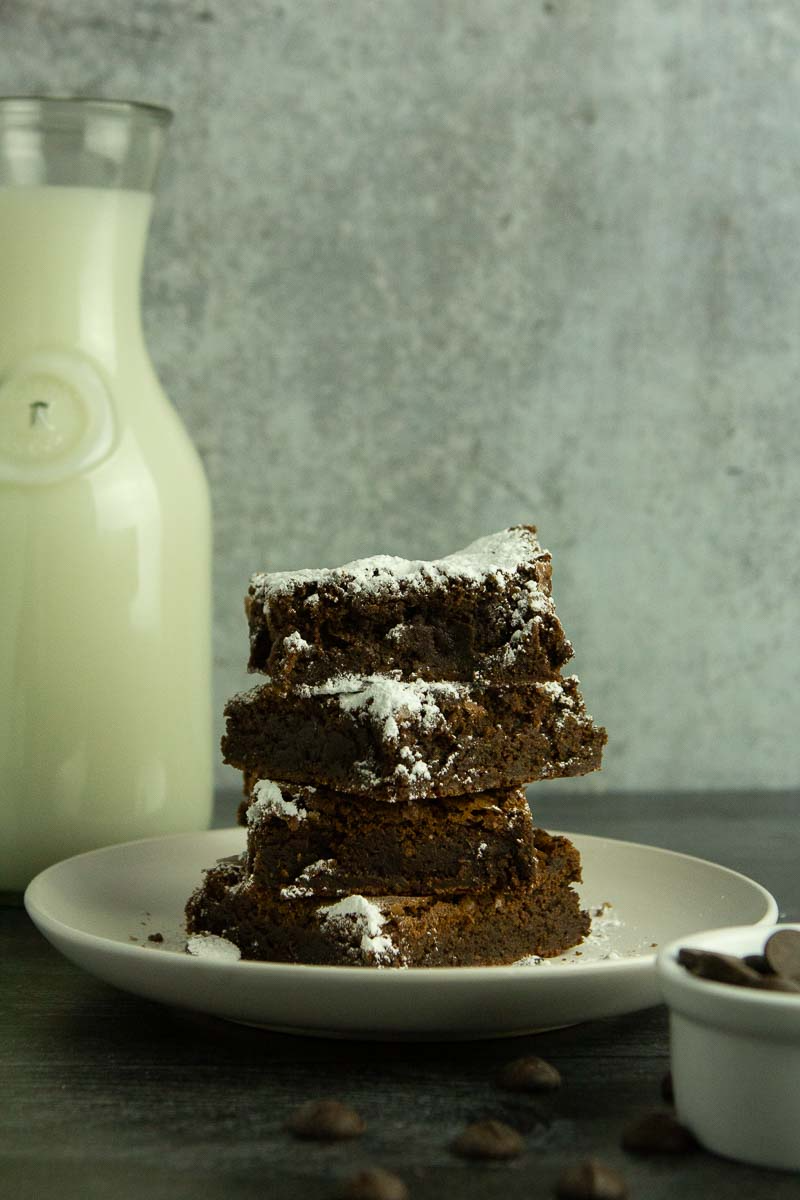
These credibility shots testify you a crude case of how different colour temperatures from your called light source can have major effects on your photos. Bank check out the divergence in the color temperature from the middle neutral (perfectly balanced) compared to the extreme examples of the cool blues and warm orange/xanthous tones on each end of this comparing! The slightly cool, blue tone in the fourth photo or the yellow-y, orange warm tones in the second photo certainly wouldn't be too noticeable until you lot see them side by side to the true neutral in the middle. This how-to will help yous achieve THAT true neutral, color-balanced middle photograph! Notation: none of these have been edited for exposure. That's why they look so dark.
Selecting the right lighting conditions
Whether you use a DSLR or phone photographic camera, choosing the most neutral lighting weather condition will assistance you lot accomplish proper white rest. With that said, neutral lighting is more important for phone camera photographers since telephone cameras don't allow you to alter your white balance in-camera. Basically, the lite has to exercise more than of the heavy lifting. In dissimilarity, DSLR cameras let you to choose automatic or custom white balance settings that permit you lot compensate for light that skews also warm or cool.
If your calorie-free is coming from the ambience light in your domicile rather than artificial lights specifically positioned to light your scene, your telephone WILL find and you will see orange or blue hues in the shadows and highlights, where they definitely shouldn't be! To set up this, you lot have iii options:
- Switch to natural light
- Invest in an bogus light setup containing bulbs shut to the neutral position on the Kelvin scale
- Edit in Lightroom
Natural Light
If you lot're using natural light, the hue of the light depends on a lot of factors including window direction, time of year, and weather. The hue of the lite likewise changes throughout the twenty-four hour period, and looks different in the morning time, midday, and afternoon. To determine when YOUR light is about neutral, I recommend setting up a scene and taking a photo of it every hour from 8 am-ish to v pm-ish. Comparing these photos will help you detect the time when the low-cal looks closest to neutral. For a more in-depth discussion of Natural Lighting, check out the Natural Lighting how-to next!
Artificial Light
If you're prepare to attempt artificial lite, consider a continuous soft box with a near-neutral seedling. This one from B&H Photograph is a skillful option. To learn more about how to set up up and use a continuous soft box, my Bogus Lighting how-to is a nifty one to check out!
No one thousand atter which light source you use, you lot'll want to perfect the white balance by editing in Lightroom at the end!
Notation to phone camera users: at this point, you may want to skip to the Lightroom Editing section. OR keep reading to acquire the white balance benefits upward upgrading to a DSLR camera when y'all're ready!
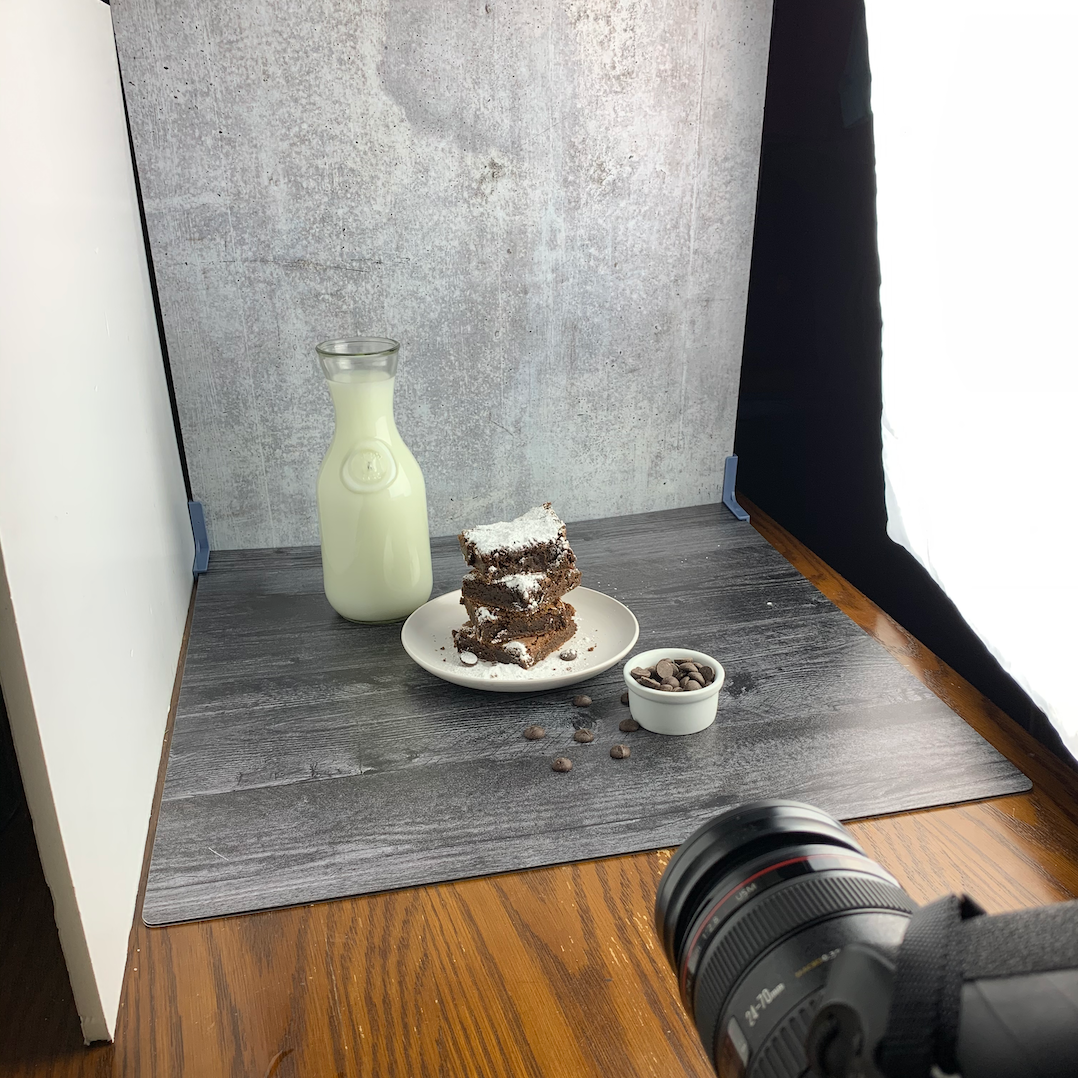
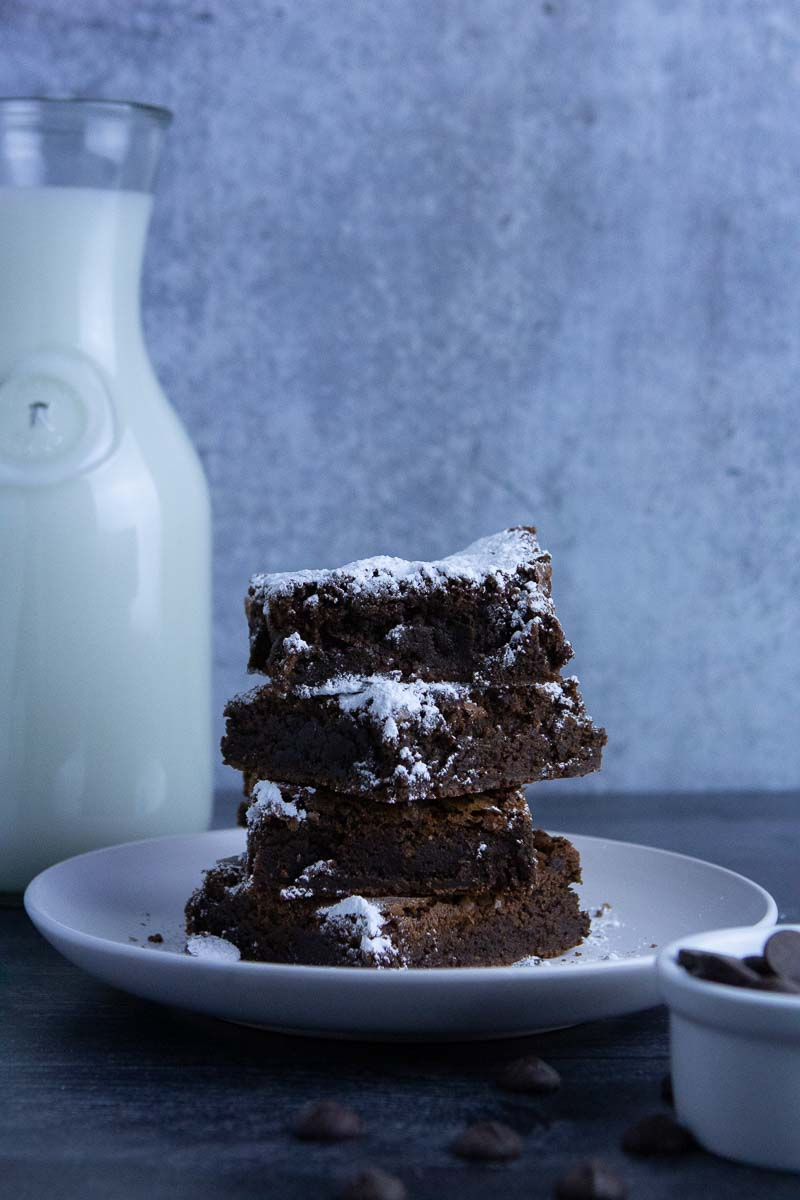
Here's the behind-the-scenes of the brownie shot with a continuous soft box to the right of the scene and a reflector on the left side of the scene to bounce the light. Here, the reflector is a piece of foam board from a craft shop. Alternatively, you can use the All-White Replica Surface or some other white-based Surface if yous have one and aren't using it in your scene. This BTS shot was taken on an iPhone XS Max with no added editing, by the style.
White Balancing In-Photographic camera (for DSLR users)
The first pace to achieving white balance with a DSLR camera is to white residue in-camera. White balancing in-camera will aid you get your whites and colors equally close to true as possible. Then y'all tin can make small tweaks in Lightroom to perfect your photos. Skipping in-camera white balancing will lead to a LOT more editing on your role, then it'southward worth taking the time to white residue in-camera.
There are two main ways to white balance in-camera: the Automated White Balance (AWB) setting or the Custom White Residuum (CWB) setting.
Automatic White Balance (AWB)
Nearly mod digital cameras have an "Automated White Balance" (AWB) setting under the "White Balance" carte du jour. If you accept never inverse or altered the white residual on your DSLR before, then you are likely already operating on this white balance manner.
For the most part, your photographic camera does a pretty great chore of correcting the color when this option is selected. Of grade, in that location are a few exceptions since nix automatic is ever truly perfect!
All we did to meliorate the white balance in this credibility photo was select the AWB setting and take a photograph as we normally would.
If your white residue looks off using the AWB setting, the biggest culprit can sometimes be contrasting colors in your scene. For example, you lot've got a big bowl of strawberries against a bright blueish background. Your photographic camera may recognize the red as the primary color and overcompensate with too much added bluish. Desire to be as near-perfect as you perchance can? Custom White Residue (CWB) is what you might need!
Machine White Balance (AWB)
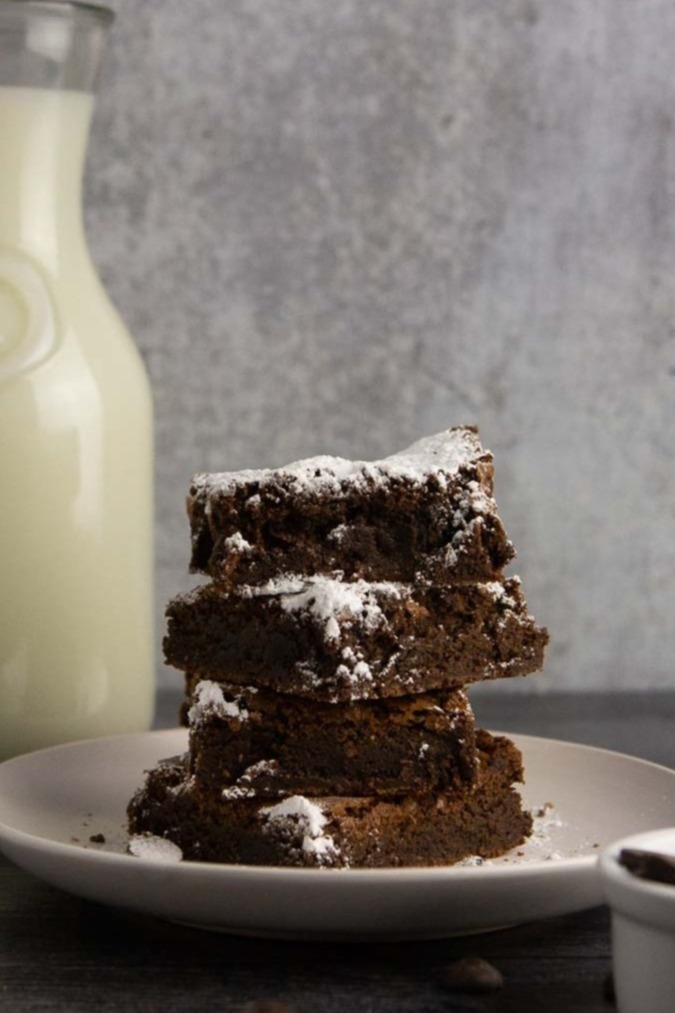
This shot was taken with the default AWB setting on a DSLR camera. Notice the yellowish hues in the milk jug in the background and the discoloration in the plate nether the brownies. The plate bears some pink and yellow hues that could be worked with in Lightroom but you could nail it past setting a CWB.
Custom White Balance (CWB)
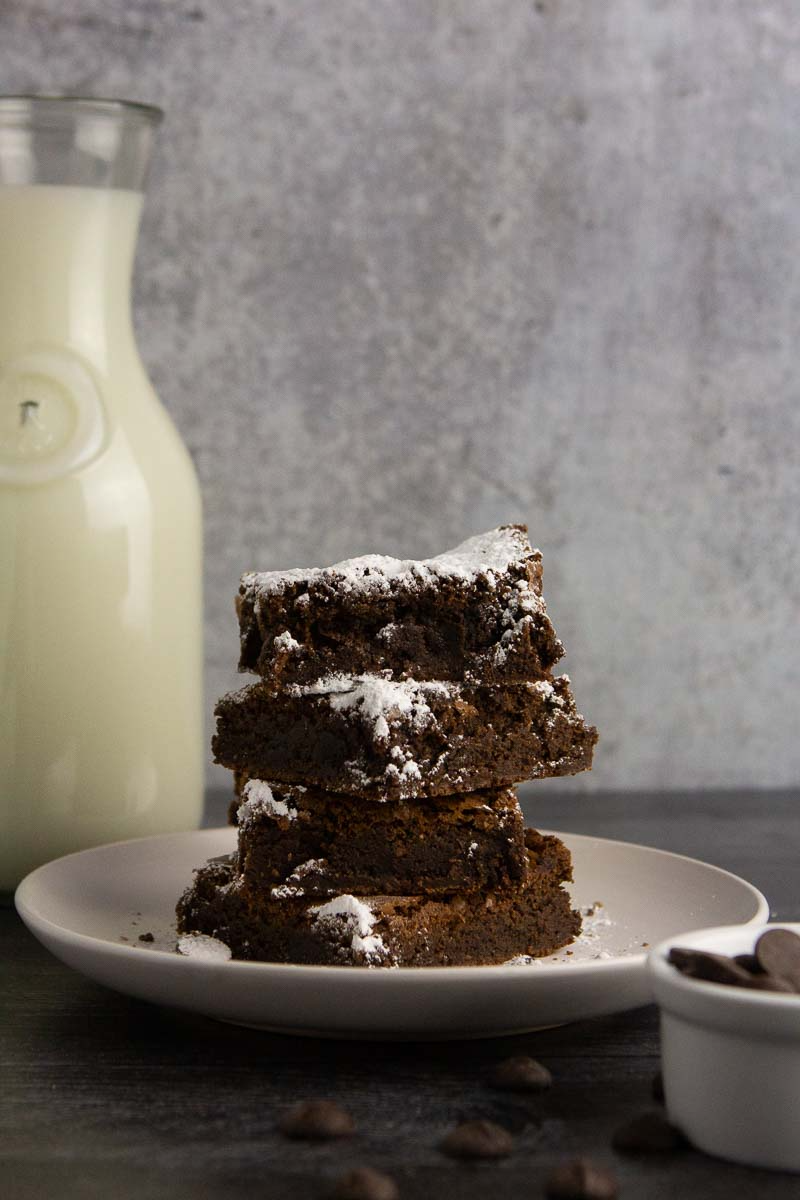
Contrast the AWB photo with this photo taken with a CWB setting using an ExpoDisc. With CWB, the camera interprets the jug of milk in the background to take a more neutral white and plate is much closer to the off-white color that information technology looks to our eyes.
Side notation: In addition to the "Automatic White Residue" setting (pictured in a higher place), your camera likely has other white rest options under the "White Balance" card. These may include "Daylight," "Shade," "Cloudy," "Custom," etc. Y'all tin can see examples of these settings below. I rarely use any of these other white balance settings for indoor backdrop-based photos (they tend to be more useful for outdoor or portrait photography), but wanted to show you other options, since it may be fun to experiment with your camera functions to encounter if whatsoever arrange your personal style.
In the case beneath with the half dozen "automatic" camera white balance settings, you can see that the AWB setting definitely does the best job in terms of capturing the color correctly. So feel complimentary to either play with these other settings or ignore them - it's your call!

This photo above was taken in AWB or "Machine White Residuum" mode.
This photo higher up was taken in "Daylight" way.
This photograph to a higher place was taken in "Shade" mode.
This photograph to a higher place was taken in "Cloudy" fashion.

This photograph to a higher place was taken in "Tungsten Low-cal" mode.
This photograph above was taken in "White Fluorescent Light" style.
If y'all like what y'all run into after you get your AWB shot, stop in that location and popular your photos into Lightroom for some mail service processing! If non, go on reading!
Custom White Balance (CWB)
If AWB isn't making your whites and colors as true-to-life as you'd like, accept your white balance to the next level by using the Custom White Balance (CWB) setting. The photos beneath show you the divergence between the AWB setting (which didn't practice a great job white balancing in this case) and the CWB setting (which did a stellar chore)!
Note that CWB requires a separate tool: either a grey card or an ExpoDisc. We'll talk about both below!
AWB with overhead ambient lite emitting yellow hues.
The same scene with ambient lite only with CWB. Hither, we used the ExpoDisc to calibrate the correct white rest. A greyness carte du jour would have accomplished the same look!
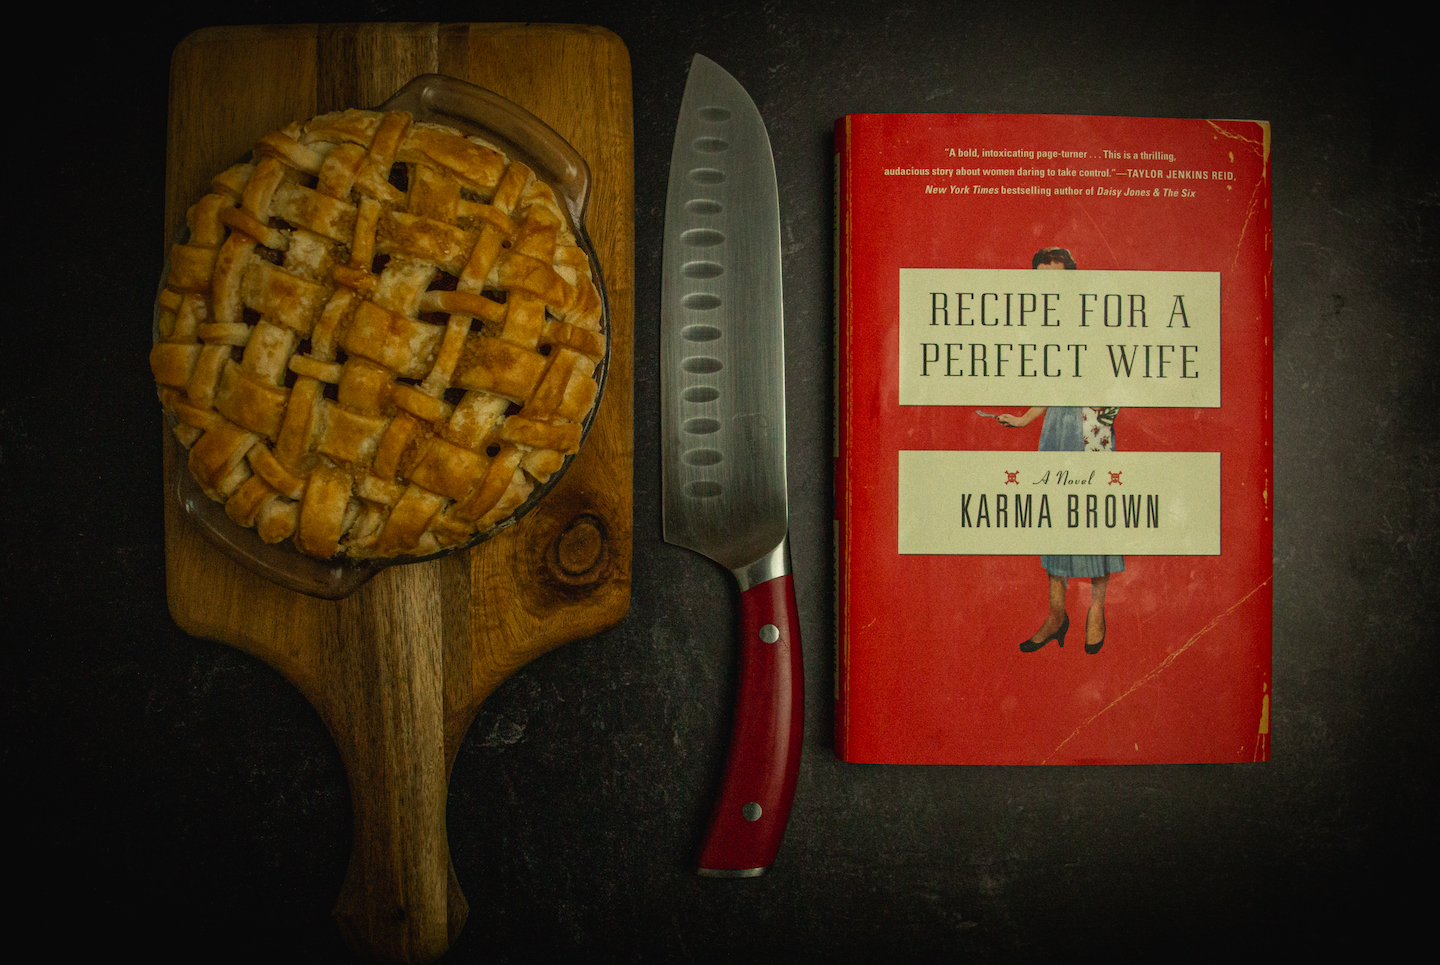
Using AWB. The warm tones of the tomatoes and Cutting Board Surface tricked the camera into thinking it needed to overcorrect with added blue tones on the Cutting Board Surface and the tomatoes simply end up looking done out and blah.
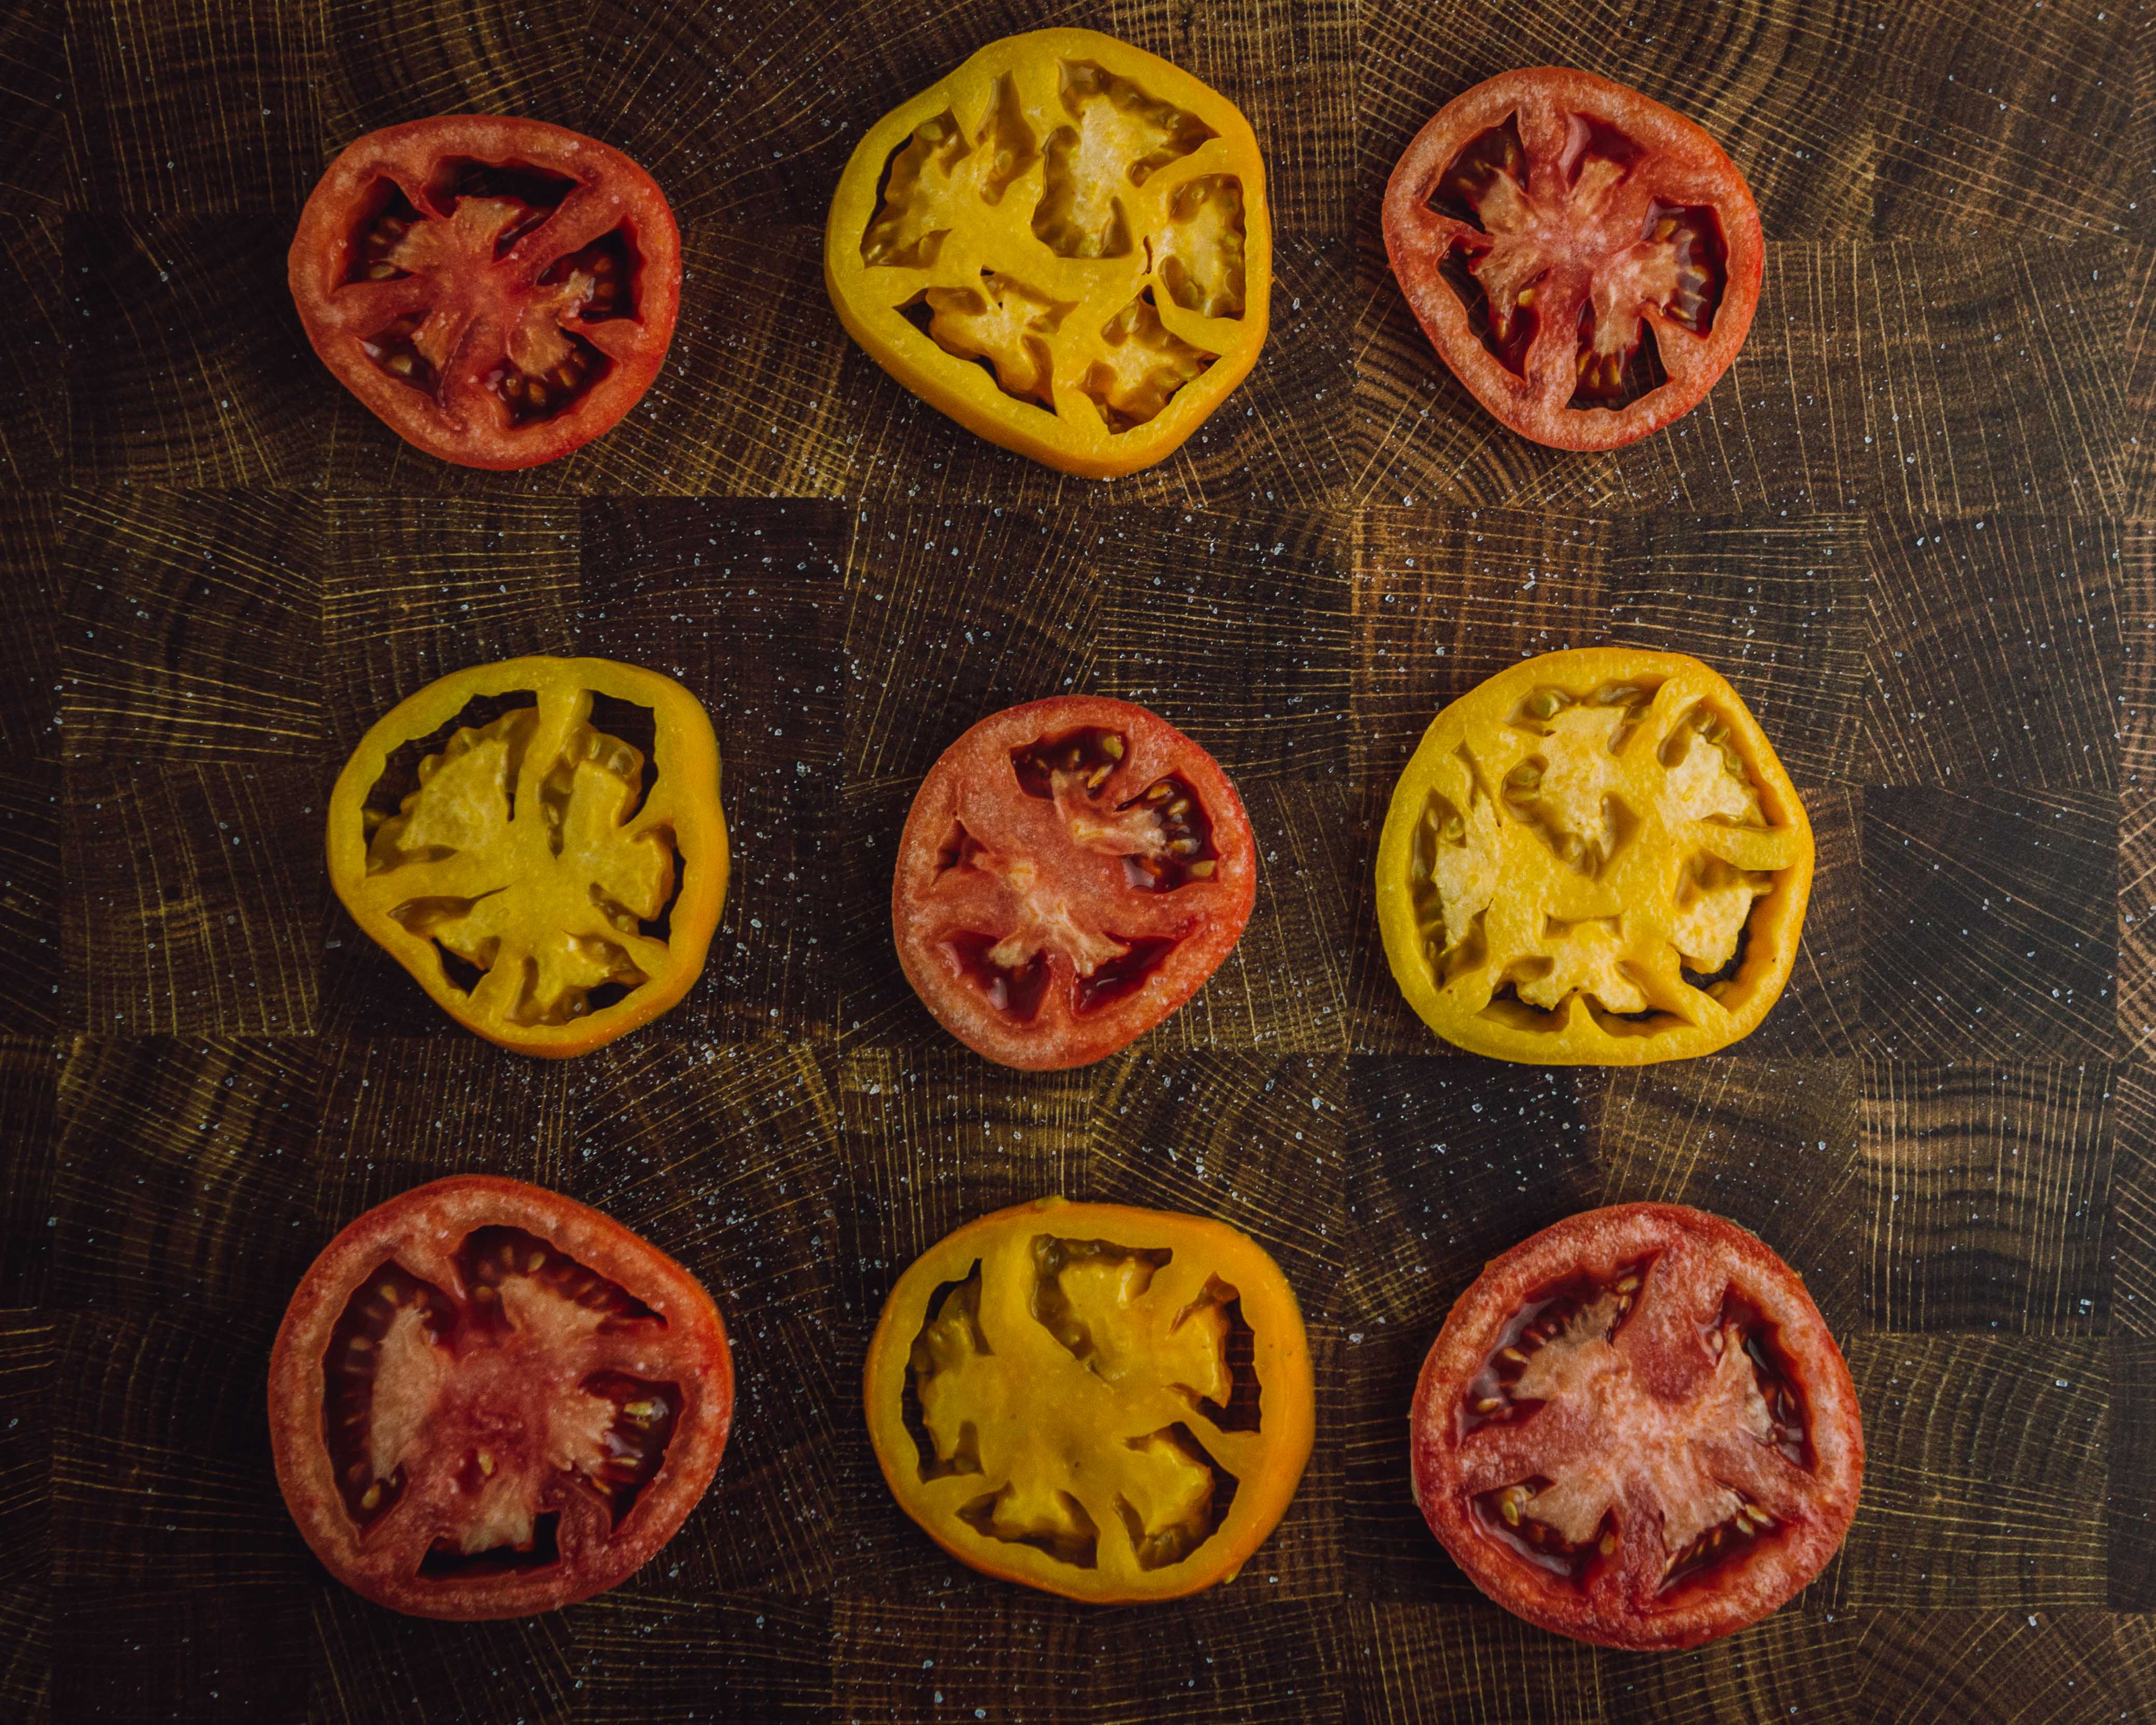
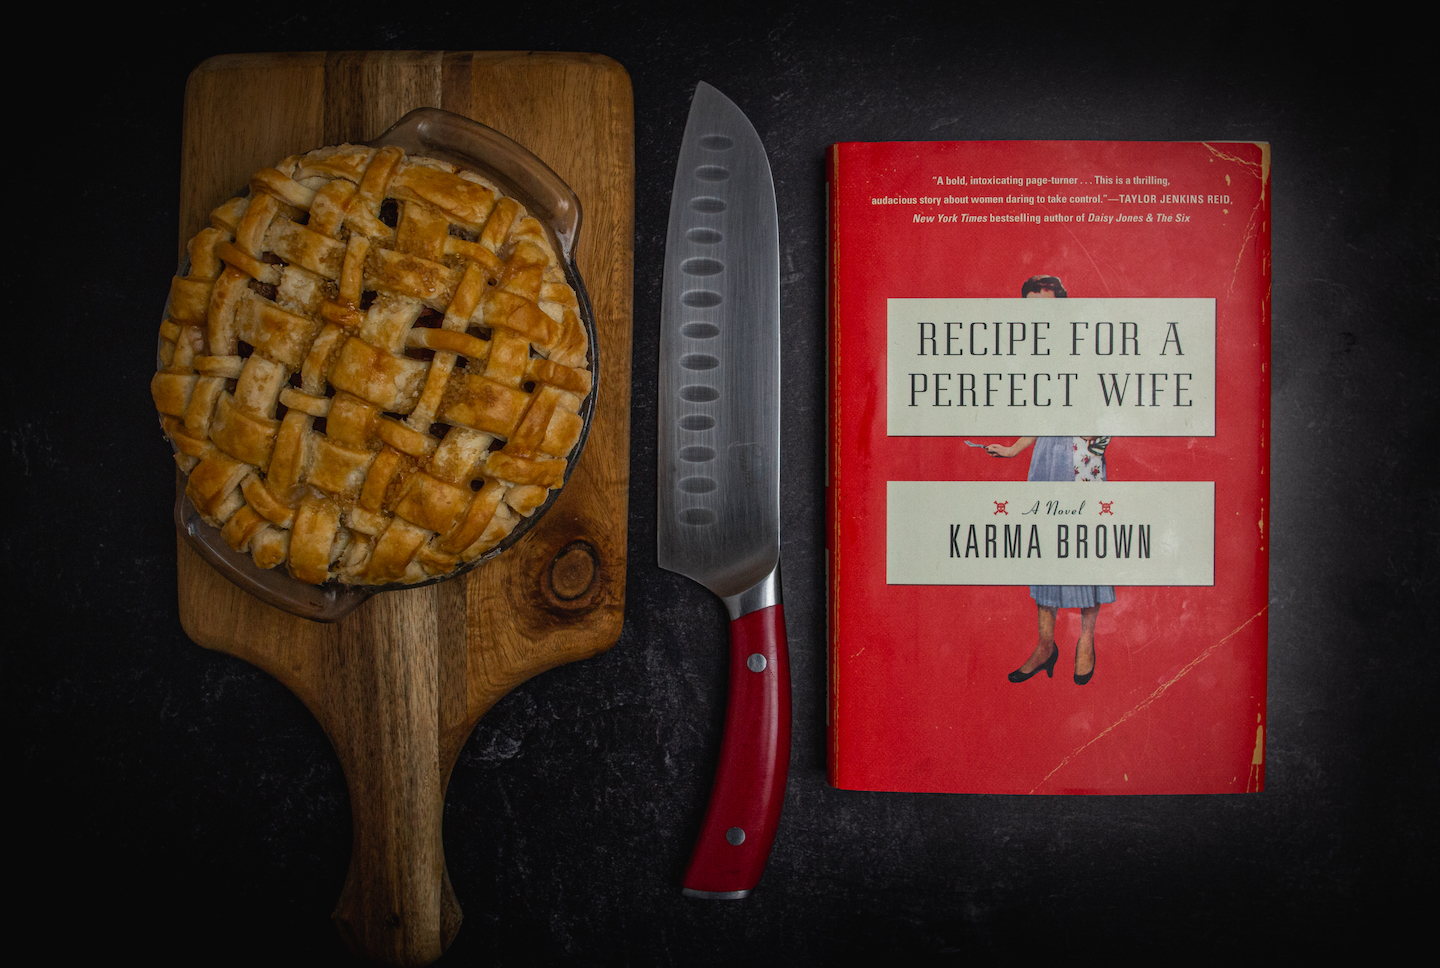
The same scene with the ExpoDisc used to calibrate CWB. See how the Cutting Board Surface looks warm and the texture is more brown and cozy?
As you can tell from the photo descriptions above, CWB requires a divide piece of equipment: either a gray card or an ExpoDisc. Whether y'all white remainder using a gray card or an ExpoDisc, the principle is the aforementioned: show your camera what "neutral" temperature looks like in your particular lighting conditions. That will let it to apply that data to your photos and right for warm or cool lighting.
Gray Cards
The first option for custom white balancing is to apply a "gray card." A gray bill of fare is a "middle greyness" reference tool used by creators to calibrate white balance and produce consistent epitome exposure and color in video production, picture show and photography. A grey card is literally a piece of cardstock printed with grey ink (hence the name)! I'd recommend this 1 from B&H Photo. If y'all find a different one that you prefer, go for it! None of the links I share are ever sponsored or affiliate.
To utilize a gray card:
- Prepare up your scene and lighting. If you're using a telephone camera, you'll want the well-nigh neutral natural or bogus lighting you lot can go.
- Set your white balance to AWB.
- Concord the grayness card in front of your lens, at to the lowest degree a few inches away from it. Past holding it a few inches in front, your photo will capture both the card and your lighting conditions.
- Have a photo of the gray card, with the bill of fare in focus. Nosotros'll call this photograph a "target neutral" photo. If you're including a friend'southward hand in your final scene (rather than your own) consider having them concur the card! This tin can be helpful in determining the right pare tone in your terminal photo.
- Become into the White Balance card and select "Custom" (or whatever sounds closest to that on your photographic camera).
- Your camera will then inquire you to select which photo you desire to utilise to white remainder. Select the "target neutral" photograph y'all merely took with your grey carte du jour.
At present your white balance is set and you can accept a photo of your scene just like y'all ordinarily would! The photographic camera volition correct the whites and colors to look more true-to-life.
And recall that all cameras are different, so if you're having trouble finding those menus or settings, explore your camera menu for the white balance settings or observe them in your camera manual (if yous withal have it)! If not, YouTube videos are your friend.
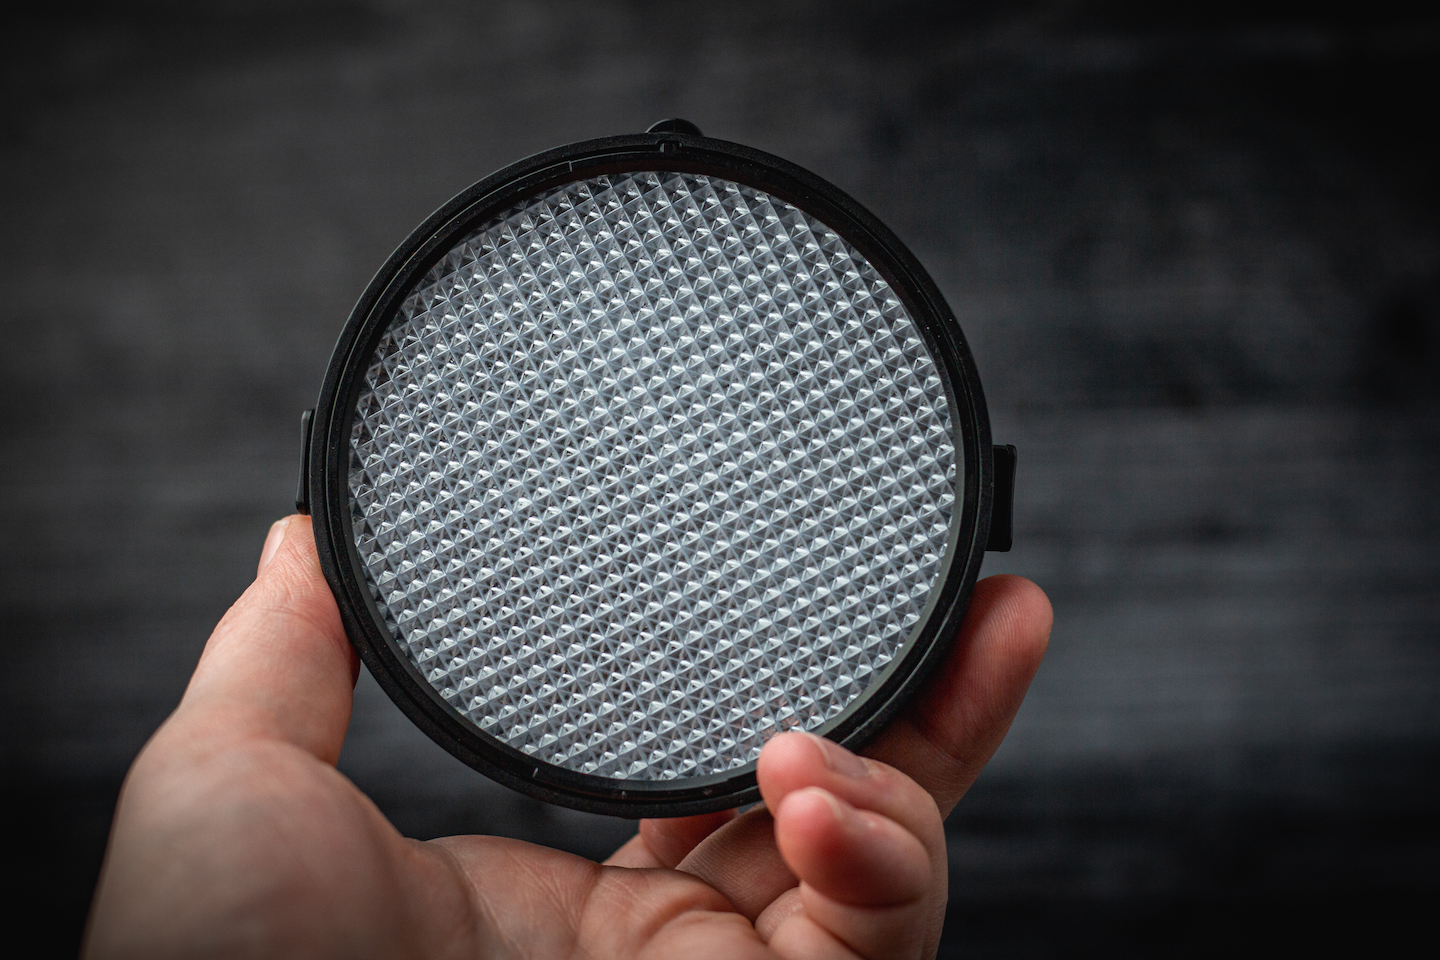
ExpoDisc
The ExpoDisc is an alternative to a gray card and is a lens zipper that clips onto your lens. The benefit is that the ExpoDisc clips onto your lens and so you can take your white balance "target shot" easily-free without having to mess around with belongings a gray card. Because the ExpoDisc allows light through, your "target neutral" photograph will look entirely gray and be calibrated to your lighting conditions.
The ExpoDisc comes in two sizes to fit your lens: ExpoDisc 77mm and the ExpoDisc 82mm (each linked hither, respectively). Choose the size that will all-time prune onto your lens. If yous don't want to mess around with clips, you lottin can also hold the ExpoDisc up to the lens and information technology will piece of work just fine! While ExpoDiscs aren't crazy expensive, the downside is that they are more costly than a gray menu.
Hither's how to use an ExpoDisc, footstep-by-step...
- Set upwardly your scene and lighting. Turn on your camera
- Look at your lens and await for a switch for focus. There should be an AF (auto focus) and MF (manual focus). You volition likely already be on AF and this is totally fine! Nosotros want to switch to MF to take the "target neutral" photograph. This focus switch saves yous and your camera time by telling your camera, "I'm doing you a favor by filling the entire frame with the neutral grayness that y'all demand in these item lighting conditions and so you lot know how to process the color and you don't need to waste time focusing, my sweet camera dear," or something along those lines!
- Fix your white residue to AWB. If you lot have never ready your white balance in your camera earlier, it is probable already ready on information technology. Most cameras default to this setting, even in manual mode.
- Clip your ExpoDisc onto your lens, point at your well-lit scene and accept the "target" photo.
- Accept off your ExpoDisc and switch your lens focus back to AF.
- Go into the White Balance setting in your camera menu and select "Custom" (or whatever sounds closest to that on your camera). Your camera will and then ask you to select which photo y'all want to use to white balance.
- Select the "target neutral" photo y'all just took with your ExpoDisc.
Now your white balance is gear up and you tin take a photograph of your scene just like you lot usually would! The camera volition correct the whites and colors to look more true-to-life. And think that all cameras are different! Your Custom White Balance might be in a different menu so at present you've got a corking alibi to only do some digging and really become to know your camera settings!
Editing in Adobe Lightroom (Archetype, CC, and Mobile)
Now that your white balance is as adept as yous can get information technology, information technology's time to edit in Lightroom. Go along in mind that editing should be nearly enhancing an already-great photo. You shouldn't rely on Lightroom likewise heavily for all your fixes when you can absolutely nail your image as before long as your click the shutter (aka by white balancing in-camera and using neutral light).
Here, we're going to focus on how to utilise the middle dropper tool plus the Temp & Tint sliders to put the finishing touches on your white rest. Then every bit a bonus, we'll impact on how to modify individual colors using the HSL panel. Hopefully your photo is already groovy so only need pocket-size edits are needed.
A quick note about monitor settings
Before jumping into editing specifics, information technology's worth making sure your screen settings are set correctly and then that your edits don't look funky when viewed on another screen! On desktop, make sure your brightness is turned all the way up. On mobile, make sure Dark Shift (or whatever equivalent you have on your phone) is turned off.
On iPhone, Night Shift is a setting that automatically tones down the blueish lite from your phone and emits more orange light. It is thought to be helpful in allowing your eyes a break from the blueish light of screens past emitting softer, orange light when the dominicus goes downward. It's great for falling asleep, only bad for editing photos since it artificially alters their temperature!
Go alee and switch back and forth between the ii to see the difference information technology tin make in your images' colors. These screenshots (below) of the Settings app in an iPhone should have yous directly to the Nighttime Shift command menu. This Night Shift option tin also be found through a similar route using the settings for MacBooks and other Apple tree reckoner products.
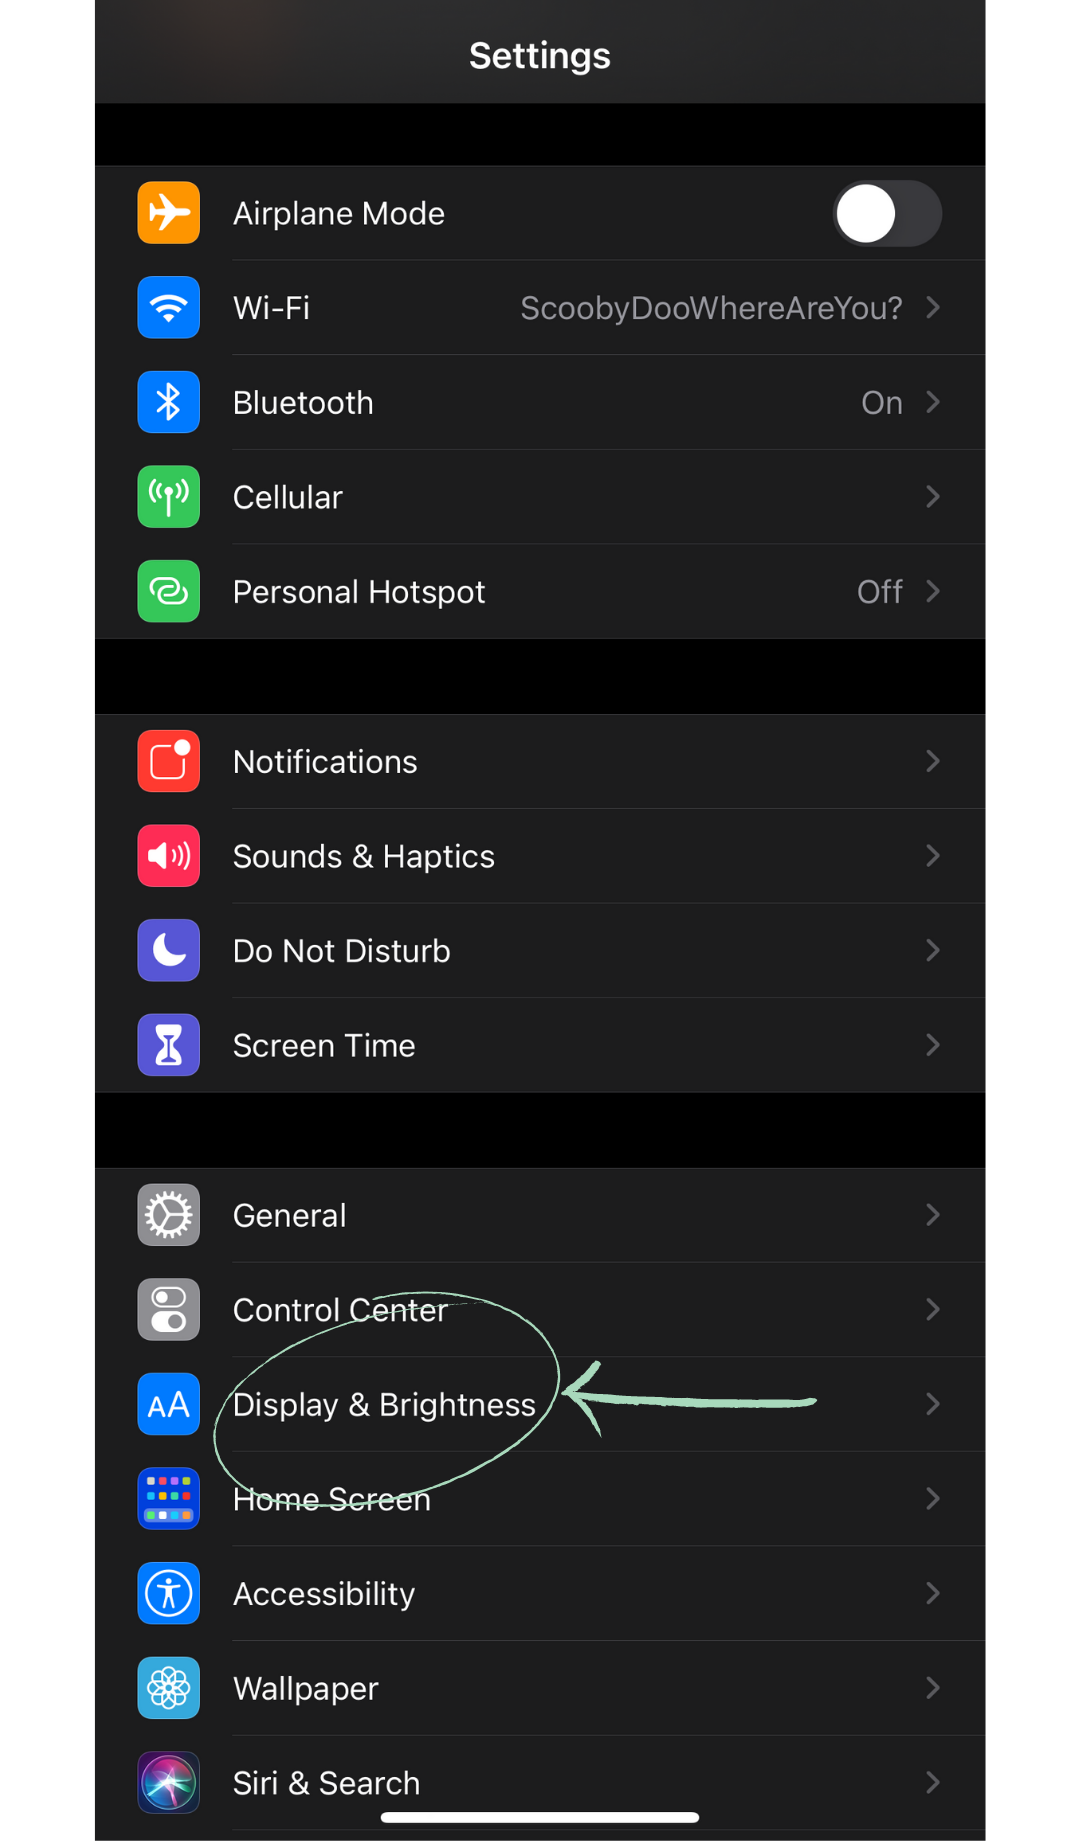
Enter the Settings app on your iPhone and scroll down to Display & Brightness.
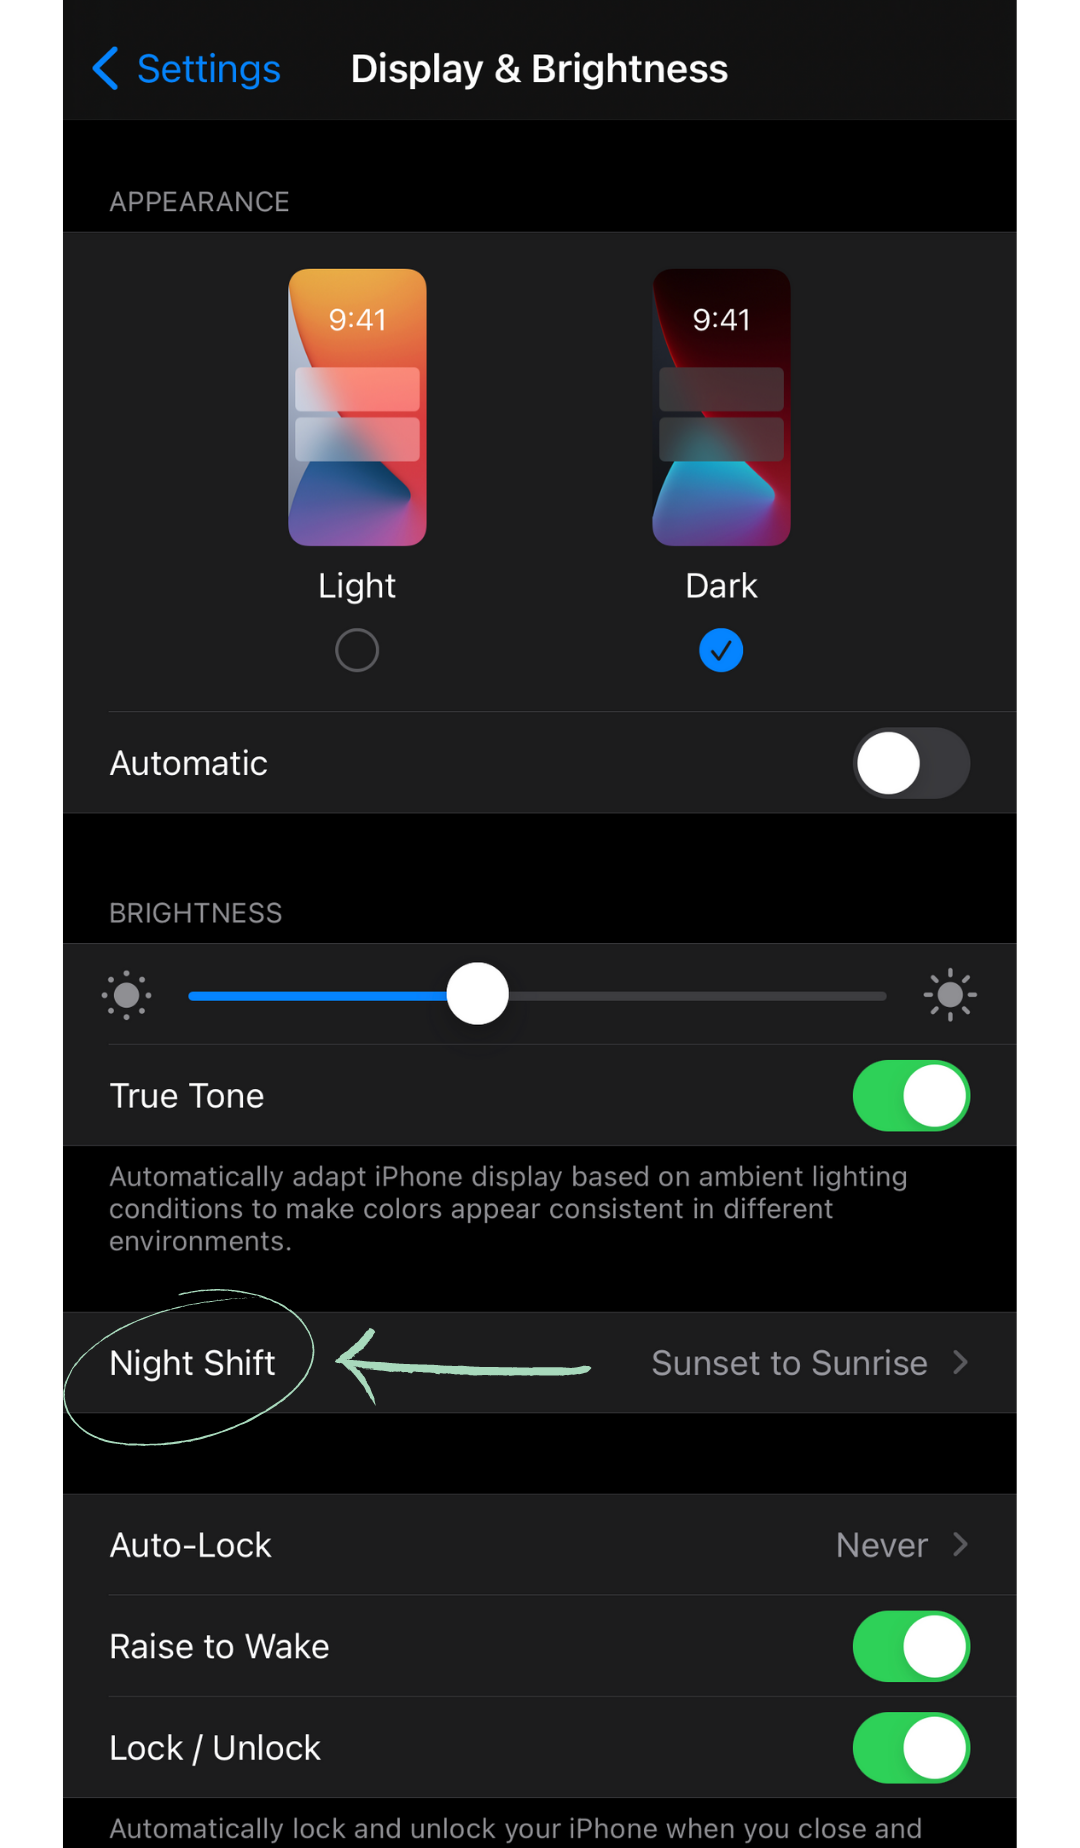
Scroll down to the Night Shift option in this menu to change your settings. This is also where yous can switch your phone to a dark appearance.
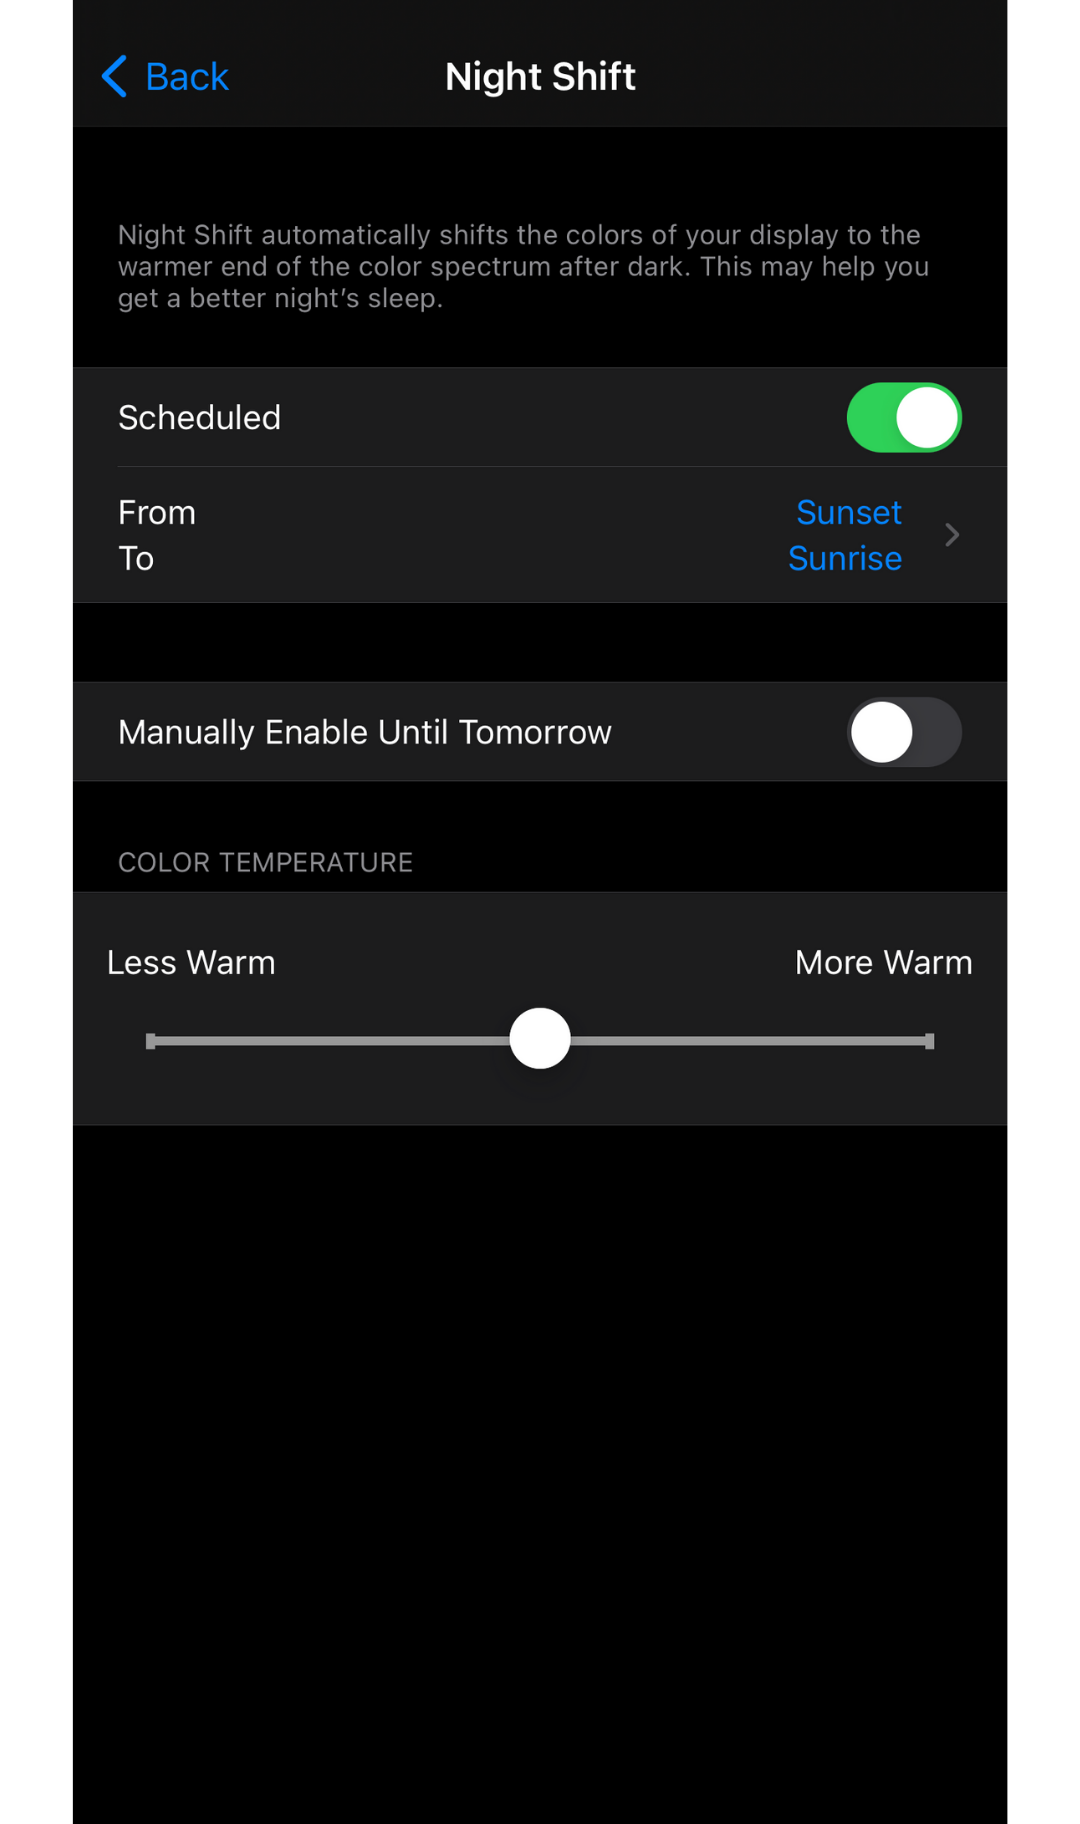
Make certain the slider is set correct in the middle before you start editing!
The eye dropper tool is your best friend when it comes to putting the finishing touches on your white balance! In Lightroom Classic (which we're using in the screenshots below), the eye dropper is located correct above the Temperature and Hue sliders in the main editing console.
In Adobe Lightroom CC and Adobe Lightroom Mobile, the eye dropper is located under the "Color" tab. In these versions, the eye dropper is actually called the "White Remainder Selector" which we'll phone call WBS for curt.
Here'southward how to use it. And disclaimer, if you're reading this on mobile, the screen grabs are going to exist modest! Consider switching to desktop to get the well-nigh out of this section.
Pace 1: Upload your photo into Lightroom Classic, CC, or Mobile.
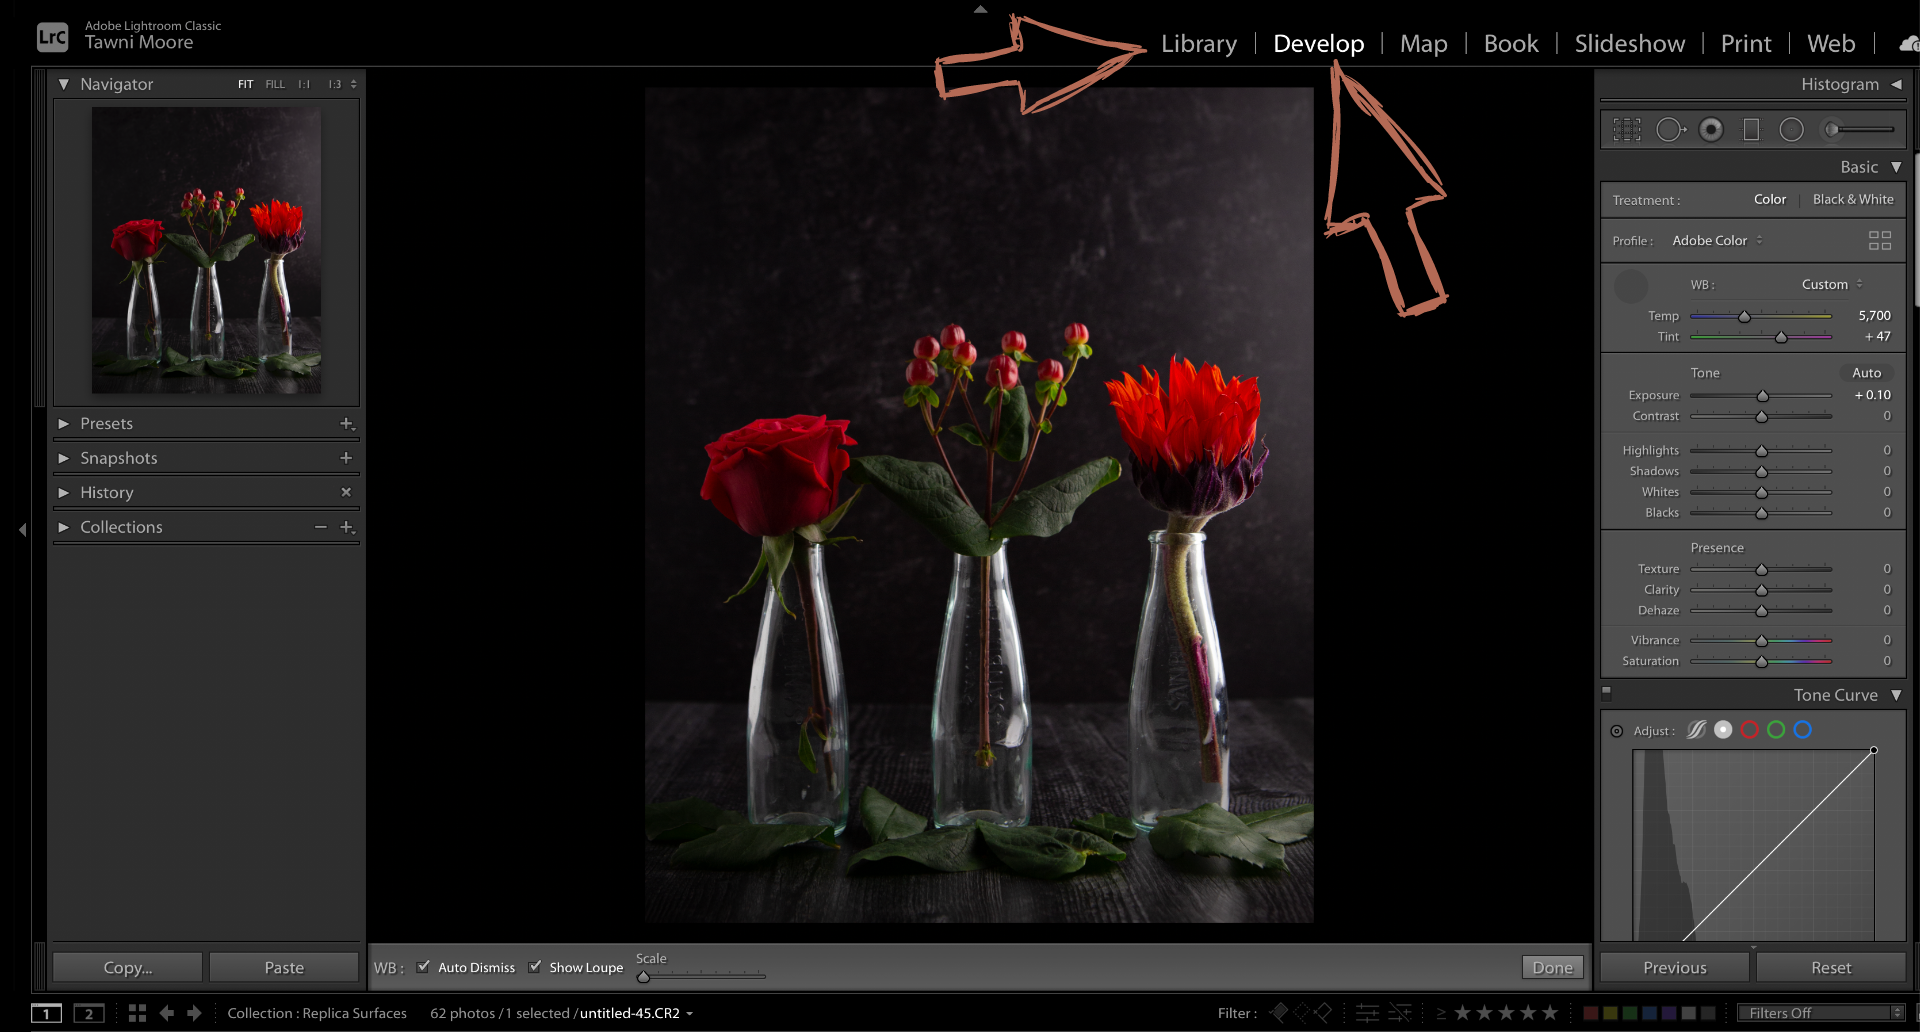
Above is a screen grab from Lightroom Classic. You upload your photos in the Library module (located in the menu on the top right of the screen) and and so edit in the Develop module (they're correct next to each other). The Basic editing panel is where you will find the Eyedropper Tool.

Above is a screen grab from Adobe Lightroom CC. Upload your photos using the petty "+" in the elevation left hand side of your screen. Click the icon on the right that looks like three petty sliders to find the Light and Color editing functions. From here, open the Color editing panel to find the White Rest Selector, Color Temp & Tint sliders, and your Color Mixer.
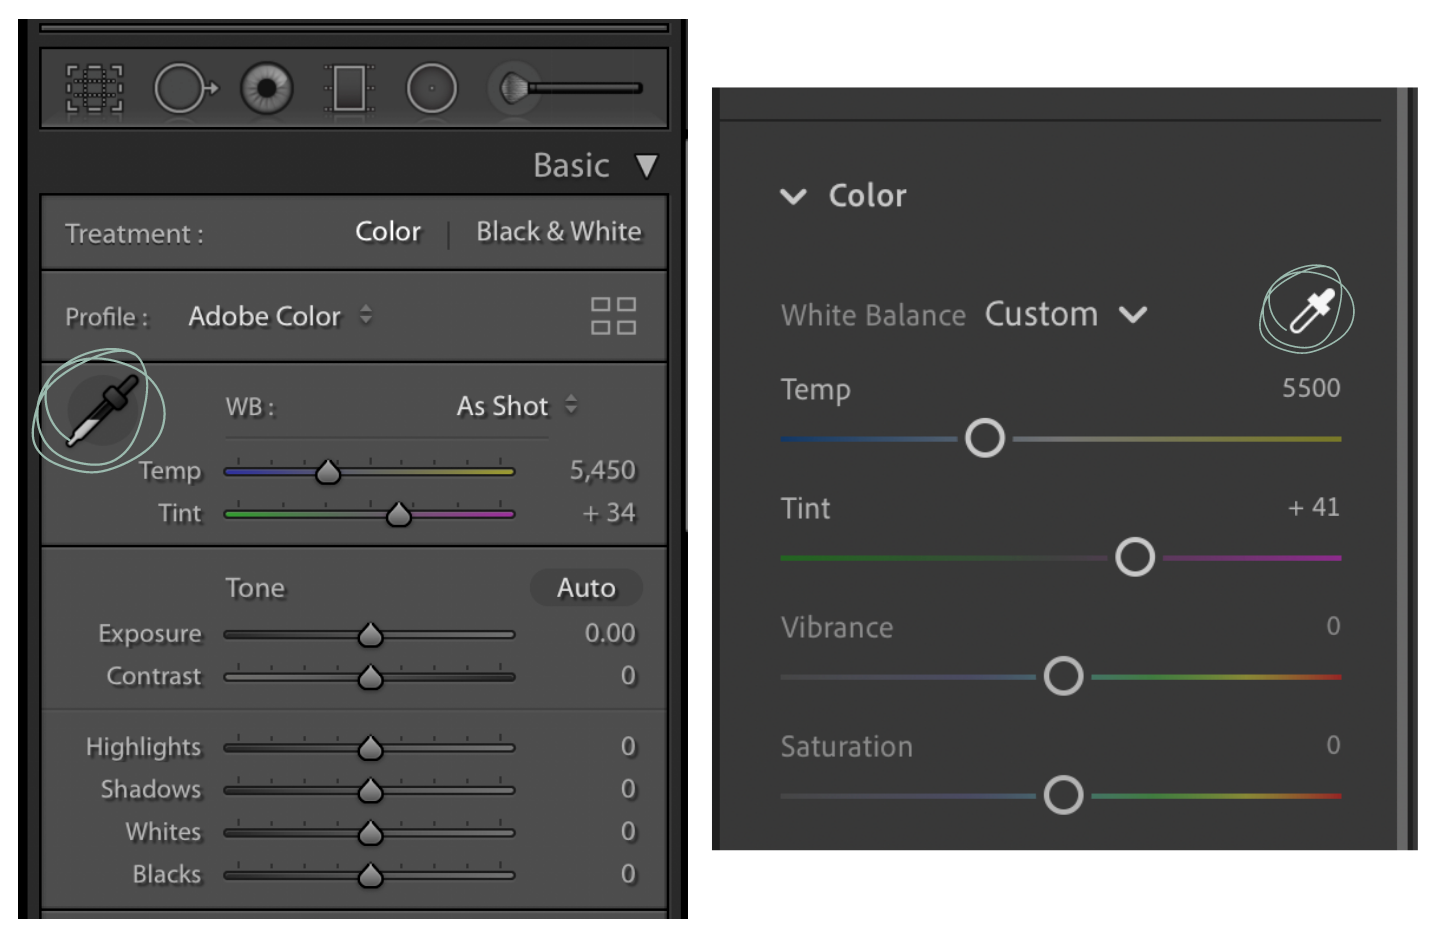
The Eyedropper Tool in Lightroom Classic (left) and the White Balance Selector in Lightroom CC (right)
Pace 2: After you lot locate and select your white residue tool, the cursor will turn into a little dropper but like the circled examples in the previous footstep above. Notice an area of your photo that looks neutral gray to your eye (similar the border of the bottle hither) and hover over it. The selected color will popular upwards in a pixelated box next to your cursor.
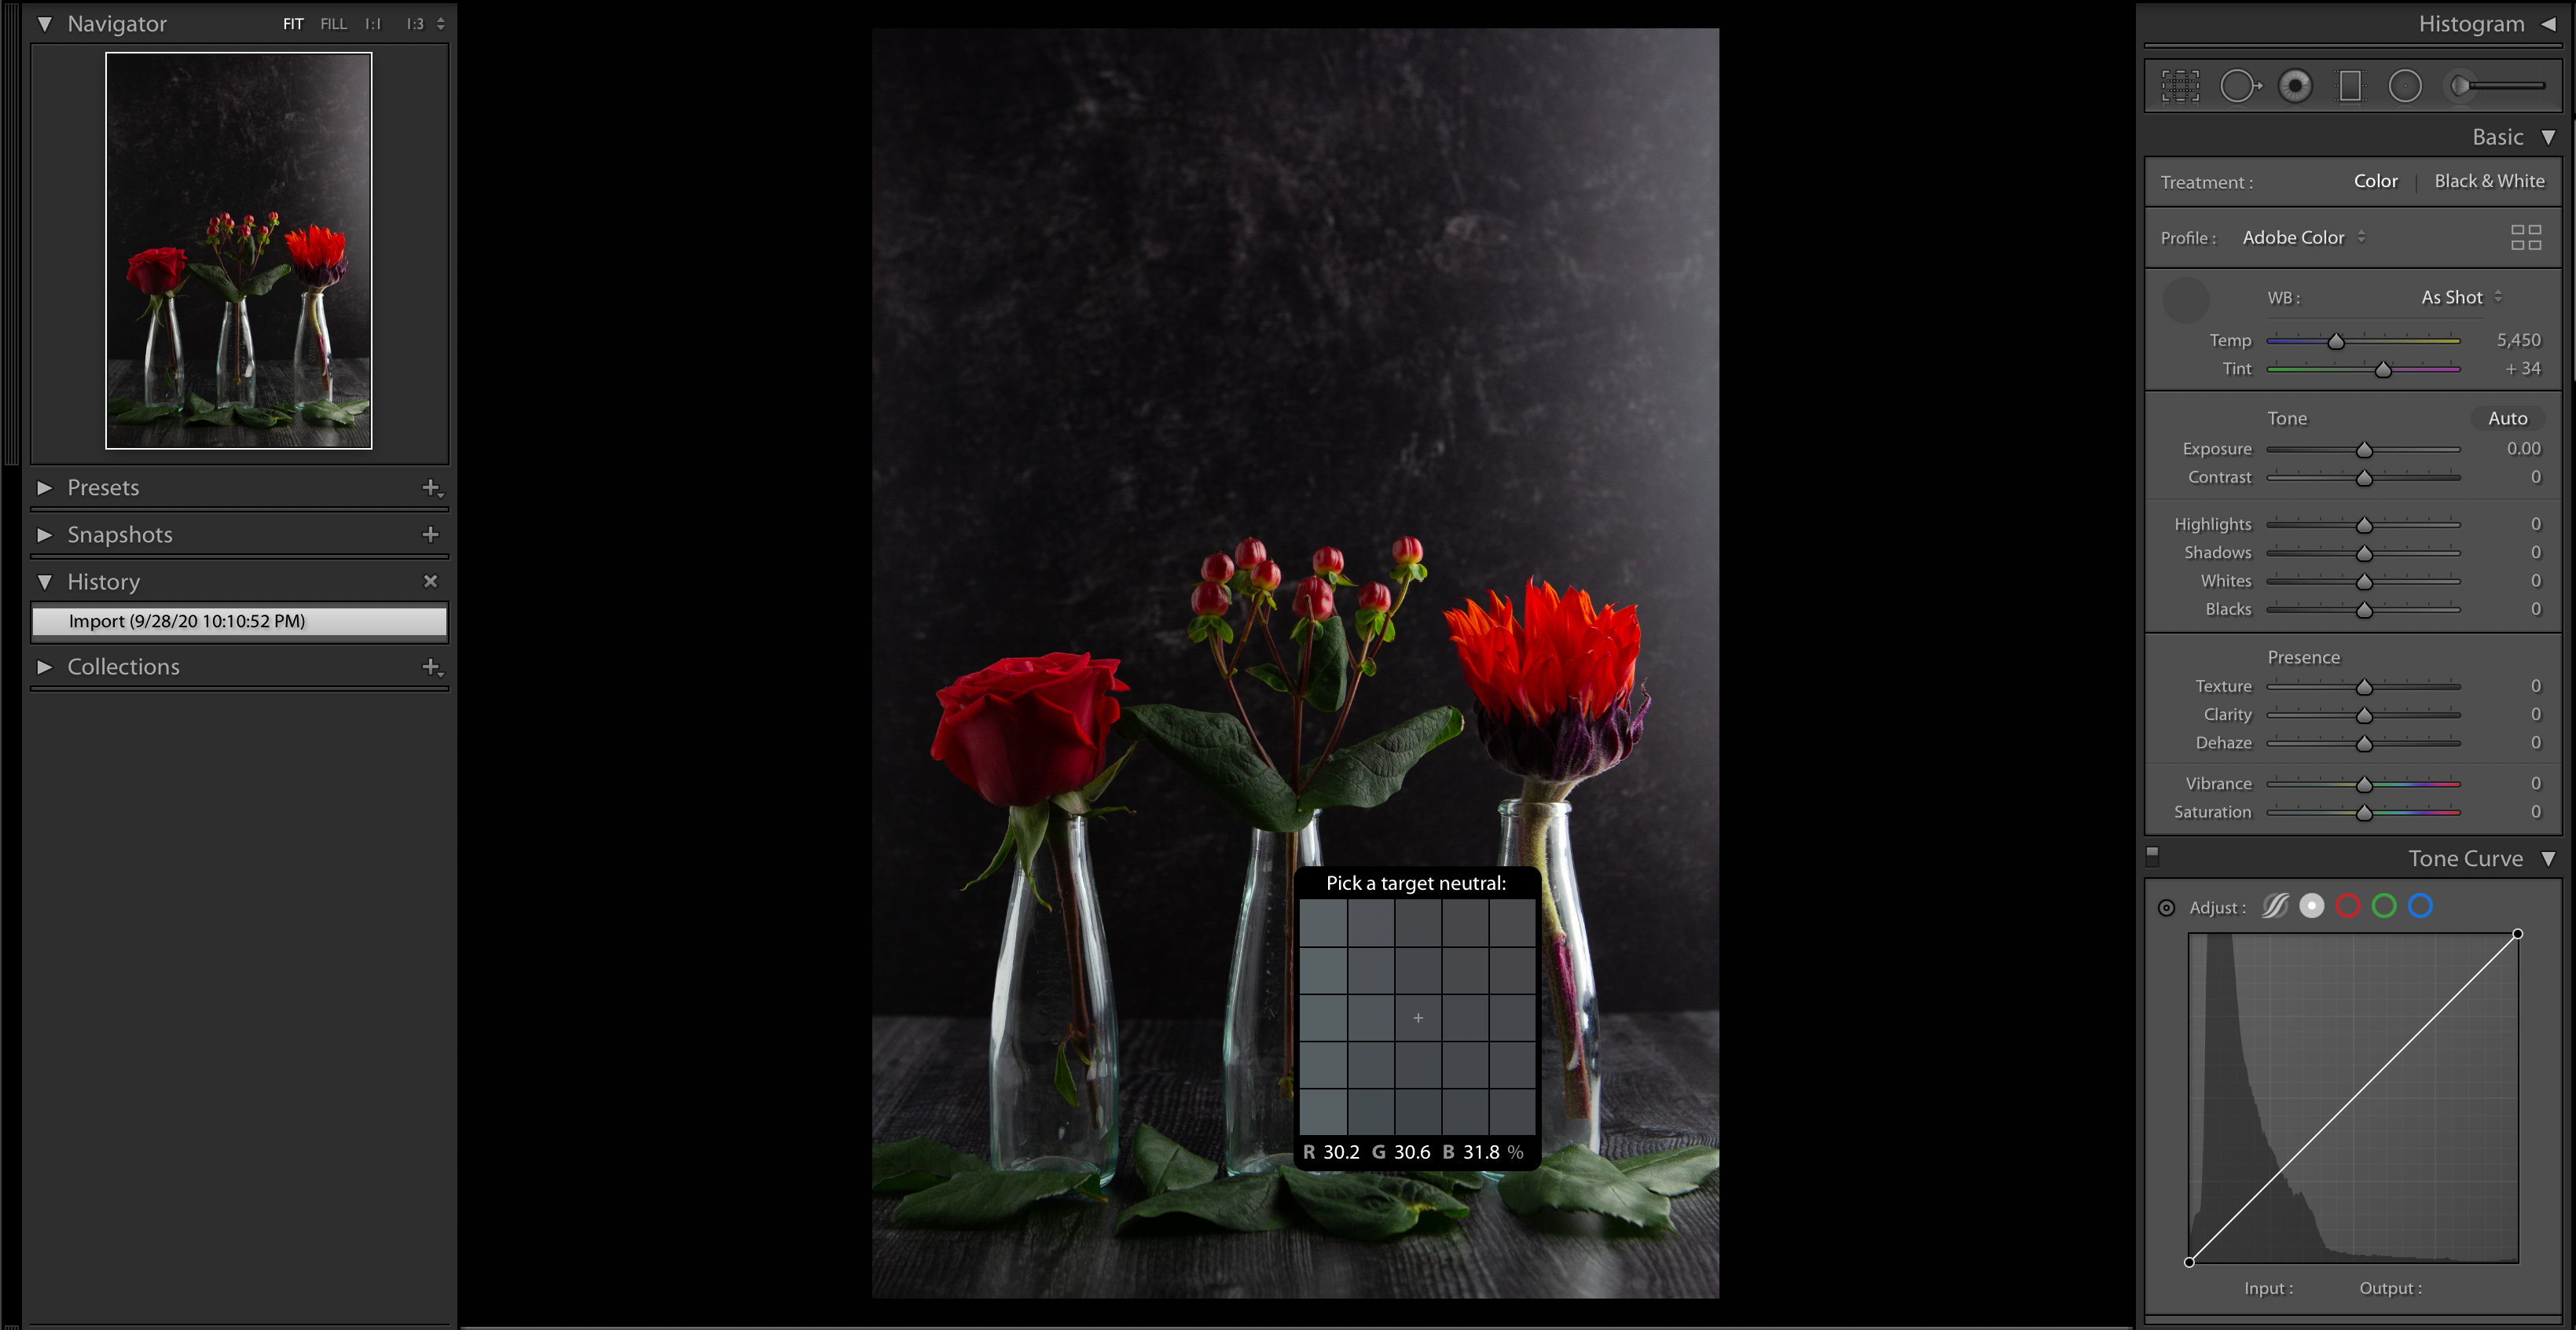
Above is a screen grab from Lightroom Classic with the selected neutral gray pixels.

Above is a screen grab from Lightroom CC with the selected neutral greyness pixels.
Step 3: Select your target neutral gray. If it doesn't look quite right, effort again!
In Lightroom Classic, there volition be a preview on the left hand side of your editing screen under "Navigator." See the purple-toned photo in the height left corner? This will let you to meet the colour your photo will become if you select the expanse you're hovering over earlier you actually select it!
In Lightroom Classic, you can see that by selecting the yellow-ish tone as the target neutral, the software overcorrects based on the idea that the neutral is abnormally yellow and so it must add blue to neutralize in guild to achieve what Lightroom "thinks" is a true neutral grayness.
In Lightroom CC, yous have to actually select the target neutral to come across the alter it will make. If it doesn't expect correct, select another expanse.

In Lightroom CC. See how selecting the cerise bloom tone as the target neutral, the software overcorrects based on the idea that the neutral is abnormally ruby so it must add together blue to neutralize in club to achieve what Lightroom "thinks" is a truthful neutral gray.
So you're editing in Adobe Lightroom and you've got your white balance Nearly perfect when you find some odd dark-green hues where they shouldn't be. This is where a pocket-sized adjustment to the Tint slider tin come up into play!
The Tint slider is less important than the Temp slider and should be used sparingly when editing. Still, color tint does play a role in your food photography! In that location'southward a reason it is called white BALANCE! You lot demand the correct combination of color temperature and tint under your natural or artificial lighting conditions in club to achieve white-whites in your photos.
If you're seeing some royal tones in your whites, moving the Tint slider merely slightly toward the greenish end can sometimes aid bring your whites and highlights to a more neutral white. Same goes if yous're seeing some greenish hues in your photo: move the Tint slider simply slightly toward the pinky/purple end of the slider. Keep the use of this slider VERY minimal, as you tin see in the photograph spectrum below, the green and purple/pink hues tin become overpowering very rapidly. Over again, these photos haven't been edited for exposure, that'due south why they all expect dark.
You may very well never fifty-fifty need to use this slider since the eyedropper tool should get you equally close to perfect as a reckoner-generated set up of eyes can! However, if yous're skewing in one of these greenish or pink directions, the Tint slider can exist that little bit of icing on the cake (or in this case, on the brownie) that you need to NAIL your white remainder!
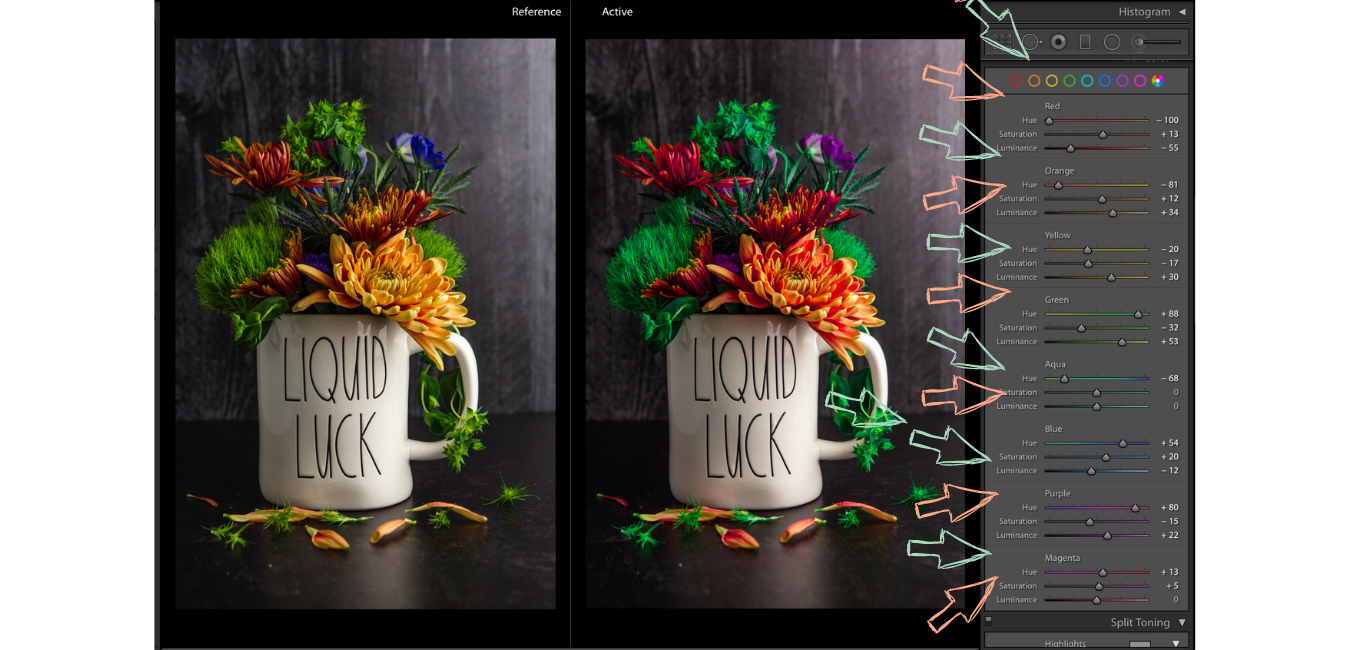
Bonus: HSL/Color Mix Panels in Adobe Lightroom
Lightroom gives you the power to modify the Hue, Saturation, and Luminance of the individual colors in your images. In Lightroom Classic, you'll find these sliders in the HSL panel (HSL stands for Hue, Saturation, Luminance, by the style). In Lightroom CC and Lightroom Mobile, you'll detect them under "Color Mixer" in the "Color" tab. These individual color sliders can exist helpful for removing bluish or orange tones from a scene in which light may have "leaked" into your scene from the light source.
Hue - The Hue slider will touch on the actual color (ie. Red tones can be altered to exist more pink or orange, while bluish tones can exist altered to become very light aqua or purple.
Saturation - The Saturation slider increases or decreases the amount (or intensity) of a detail color in your epitome. This is helpful in the event you have an excess of bluish or orange from ambient light.
Luminance - The Luminance slider can be a game changer for your color editing! This slider affects the amount of light in each color. This can darken or lighten the individual colors in an image.
In the examples below, you can encounter how altering ane colour can completely change the energy of the entire scene!

Sometimes your lighting situations are out of your control! This burger was shot in a restaurant with big garage door windows and then even though this scene was shot nether "partially" diffused low-cal, some harsh blue leaked into the scene. See the absurd tones in the groundwork and on the reflective silverish plate? You lot'd get a similar blue tone if yous were to shoot on a sunny day with no diffusion (no reflector, white sheet, etc). Only have no fearfulness! HSL is here!!

Contrast the absurd blue hues in the other photo with this neutral color temperature. We achieved this by decreasing the saturation of the blues using the bluish Saturation slider. Note that the blues are gone from the groundwork and plate, and that the BBQ sauce has a slight deviation in colour, also, due to this removal of bluish. Decreasing the dejection also made the yellow/orange tones of the bun less striking, in a good way!
As yous can imagine, Lightroom has SO much more to offer than simply white balance. To learn how to change the exposure and other settings under the Calorie-free panel, and to learn how to create amazing color transformations like the i below.
If yous've gotten to the end of this how-to, congrats! White Balance tin can be one of the trickiest photography concepts to empathize, anticipate, and execute. I promise this breakdown has helped you find more understanding when it comes to white balance and how to achieve the right colors in your images.
Now where tin can I transport yous? For some killer food styling techniques (like creating dripless ice cream) click hither. For apartment lay and product styling tricks, give this one a read. And to learn about two of the easiest styling compositions, click on this one!

Source: https://www.replicasurfaces.com/blogs/replica-surfaces-blog/white-balance
Posted by: bixleryonstopir.blogspot.com
0 Response to "How To White Balance A Camera"
Post a Comment